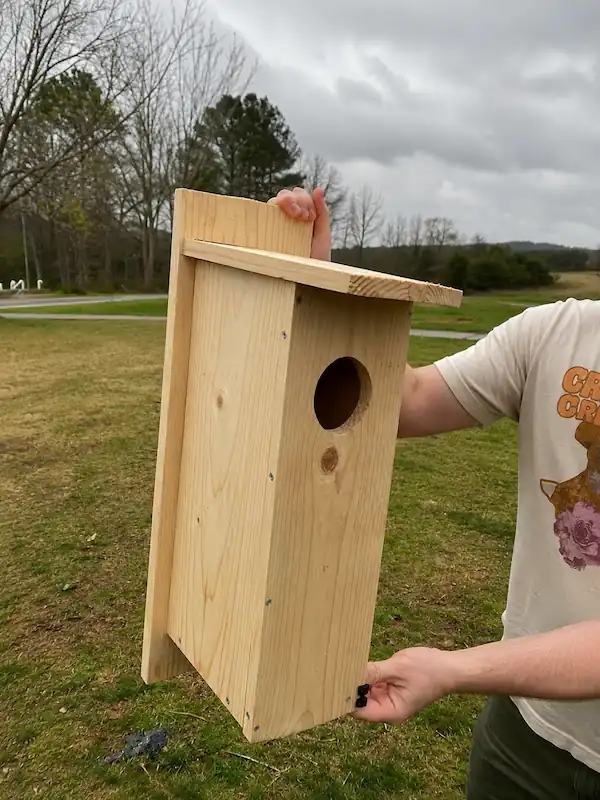
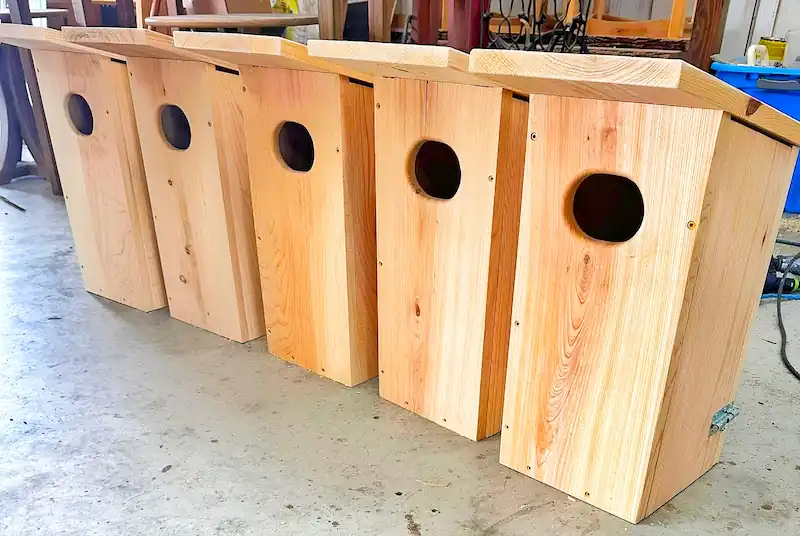
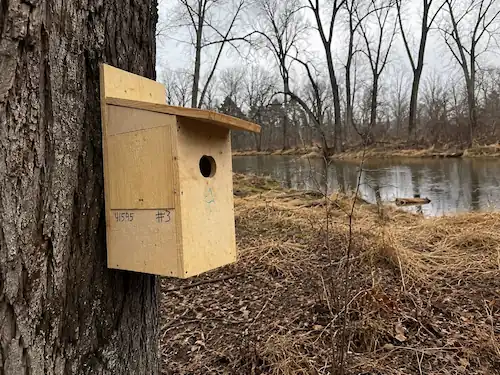
A wood duck box gives nesting hens a safe place to raise their brood when natural tree cavities are hard to find. I’ve seen boxes sit empty because they were installed a few feet too low, and I’ve seen others filled almost every spring simply because they were placed correctly.
Buying a box is the easy part. Choosing the right design, mounting it in the right location, and keeping raccoons and snakes out is what really matters. Get those basics right, and one box can attract wood ducks for many seasons.
Understanding Wood Ducks and Their Nesting Needs
Unlike Indian Runner ducks and many other ducks, wood ducks don’t build nests on the ground. They look for hollow trees, old woodpecker holes, and other natural cavities where their eggs stay dry and hidden from many predators.
Finding those spots isn’t as easy as it used to be. Years of logging, wetland loss, and competition from invasive birds like European starlings have left many wetlands short on suitable nesting sites. That’s one of the biggest reasons nest boxes became so important.
Conservation groups such as Ducks Unlimited and the U.S. Fish and Wildlife Service credit large-scale nest box programs as one factor behind the wood duck’s remarkable recovery after its sharp decline in the early 1900s.
Natural Cavity-Nesting Behavior
A hen doesn’t pick the first cavity she finds. She spends time inspecting several before making a decision. Most natural nests are 10 to 30 feet above the ground and usually close to water, often within about 100 feet. She prefers a small entrance, a deep chamber, and a dark interior where the eggs stay protected.
Once the ducklings hatch, they don’t stay long. Within about a day, they leap from the entrance and follow their mother to the nearest water. That’s why the area below the box matters. Soft grass, leaf litter, or shallow water gives them a much safer landing than rocks, concrete, or thick brush.
Conservation Status and the Role of Landowners
Wood ducks are no longer considered threatened, but they still depend on suitable nesting habitat. In many parts of the country, private landowners have more influence than they realise because most remaining wetlands are on private property.
Installing one nest box won’t change an entire population. It can, however, provide a safe nesting site that simply wasn’t there before. When that box is cleaned, maintained, and used year after year, it becomes a small but meaningful contribution to local wildlife.
Benefits of Providing Nesting Boxes
Ecological Impact
A properly placed nest box creates another nesting option where natural cavities are limited. That helps support local wood duck numbers while also benefiting other native cavity-nesting wildlife. It’s not unusual to find hooded mergansers, screech owls, or even flying squirrels using a well-built box.
Every occupied box also helps soften the impact of habitat loss caused by development and changing land use.
Personal Enjoyment and Wildlife Viewing
Very few wildlife moments compare to watching a hen appear at a box each spring. If everything goes well, you’ll eventually see a line of ducklings making their first trip to the water.
For families, it’s also a great way to introduce children to wildlife without leaving home.
Contributing to Wetland Conservation
For many people, one nest box is just the beginning. It often leads to planting native vegetation, protecting shorelines, or improving wetland habitat around the property.
Many state wildlife agencies, Ducks Unlimited chapters, and conservation programmes also provide advice and, in some areas, financial assistance for habitat improvement projects, making it easier to do even more for local wildlife.
Types of Nesting Boxes: DIY vs. Pre-Built
DIY Boxes
If you enjoy weekend projects and own a few basic tools, building your own wood duck box is a solid option. Material costs usually fall between $20 and $40, and you can build the box exactly the way you want. There’s also something satisfying about watching ducks use a box you built yourself.
The downside is that small mistakes can cause problems. If you make the entrance too large, the box too shallow, or choose the wrong type of wood, wood ducks may ignore it, and the box won’t last as long.
Stick with rough-cut, untreated cedar or cypress. Both hold up well outdoors and are safe for nesting birds. Avoid pressure-treated lumber because the chemicals aren’t worth the risk. For bedding, add a layer of cedar wood shavings, not fine sawdust, before each nesting season.
Many of the best DIY plans available today come from Ducks Unlimited and Audubon. They’ve been tested in the field for decades.
Pre-Built Boxes
A pre-built box is the quickest way to get started. Most arrive ready to mount, and better models already include features like an extended entrance, climbing grooves, and durable construction. Some even come with a predator guard or offer one as an add-on.
You’ll pay more, though. Expect to spend anywhere from $70 to $210 or more, depending on the material and build quality. Even then, don’t assume it’s completely predator-proof. Some boxes still need extra protection after installation.
DIY vs. Pre-Built: Which Offers Better Value?
If your budget is tight and you don’t mind a few hours of work, building your own box usually costs $50 to $90 after adding a predator guard. Buying a quality pre-built box costs more upfront but saves time and eliminates the guesswork.
Material also affects long-term value. A well-built cedar box often lasts 10 to 15 years with regular maintenance. Recycled poly lumber models can stay in service for 20 years or longer with very little upkeep.
Our Favorite Pre-Built Wood Duck Boxes
How We Selected and Evaluated These Boxes
Not every wood duck box deserves a spot on this list. I looked at the things that actually affect nesting success: material quality, entrance size, interior depth, ventilation, drainage, clean-out access, and overall durability. I also compared feedback from Amazon buyers, wildlife forums, and outdoor retailers to see how these boxes perform after years of use, not just out of the box.
Whenever possible, I gave preference to boxes that follow recommendations from Ducks Unlimited and state wildlife agencies. My goal is to save you from sorting through dozens of listings and point you toward boxes that are actually worth installing.
1. Woodlink WD1 Cedar Duck House
The Woodlink WD1 (Check on Amazon) is one of the few ready-made cedar boxes I’d feel comfortable installing without making major changes first. It’s built from kiln-dried inland red cedar, arrives fully assembled, and follows the features you’d expect in a proper wood duck box instead of simply looking like one.
Its front panel opens for quick annual clean-outs, and the interior includes a climbing ladder that helps ducklings reach the entrance before they make their jump. It also comes with wood shavings, so you can mount it without buying nesting material separately.
After installing this box, the first thing I noticed was how solid it felt. The cedar construction is sturdy, the front panel opens easily for annual clean-outs, and mounting it on a post took very little time. I also like that it comes with wood shavings, so it’s ready to use straight out of the box.
I don’t have any complaints about the overall build quality. The only thing I’d consider is the 4 × 3-inch oval entrance. It works well for wood ducks, but if your goal is to attract larger cavity-nesting birds like hooded mergansers, you may want a box with a slightly larger opening instead.
One thing I never skip is adding a galvanized cone predator guard. The box is well designed, but no wooden nest box can keep raccoons or climbing snakes out on its own. A good predator guard gives nesting hens much better protection.
2. Premium Pine Wood Duck House
If you want a box that’s ready to hang with very little setup, Premium Pine Wood Duck House (Check on Amazon) is worth a look. It’s handcrafted from high-grade pine and finished with a natural penetrating oil that helps it stand up to years of outdoor exposure. The pre-drilled mounting holes, heavy-duty steel hanger, and included screws made installation quick and straightforward.
The design checks the boxes I look for in a quality wood duck house. It has a 3 × 4-inch entrance, interior climbing grooves for ducklings, drainage holes to keep the nesting chamber dry, and a front panel that opens easily for annual clean-outs.
One thing I would add before calling the job finished is a predator guard. The box doesn’t include one, and I wouldn’t install any wood duck box without that extra layer of protection against raccoons and climbing snakes.
This is one of the more unusual wood duck boxes I’ve looked at. Instead of the traditional rectangular design, it uses a hexagonal body with two 4-inch entrance holes. If you want something that stands out around a pond while still providing a sheltered nesting space, it’s an interesting option.
The box is built from untreated wood and includes features that make annual maintenance easier. The removable roof gives full access for cleaning, while the pre-drilled mounting holes and included hardware speed up installation. I also like that the interior stays well ventilated without sacrificing protection from the weather.
I treat predator protection as a separate job. Even if the box itself offers some built-in protection, I always install a cone or stovepipe predator guard beneath it. That’s still the most dependable way to stop raccoons and climbing snakes.
One thing to keep in mind is the dual-entrance design. While it’s different from most traditional wood duck boxes, long-term field research has focused primarily on single-entrance boxes. If your goal is to follow the designs most widely recommended by wildlife agencies, a standard single-entrance cedar box remains the more proven choice.
4. Amcortn 2-Pack Wood Duck Houses
If you’re planning to install more than one nesting site, the Amcortn 2-Pack Wood Duck House (Check on Amazon) offers better value than buying individual boxes. Each box measures 17 × 10 × 10 inches and includes the features I’d expect in a functional wood duck house, including a 3 × 4-inch entrance, drainage holes, and interior climbing grooves for ducklings.
Its installation is simple. Both boxes come with pre-drilled mounting holes, screws, a screwdriver, and clear instructions, so you can get them mounted without hunting for extra hardware.
It is considered best for pond owners, hunting properties, or larger wetlands where installing multiple nesting boxes makes sense.
Side-by-Side Comparison of the Best Wood Duck Boxes
Product Name
Material
Dimensions (L × W × H)
Entrance Hole Size
Mounting Type
Price Range
Woodlink WD1 Cedar Duck House
Kiln-dried inland red cedar
10.88 × 15.13 × 23 in
4 × 3 in oval
Ready to mount (post or tree)
~$70–$90
Applewood Outdoor Premium Pine Wood Duck House
High-grade pine with natural oil finish
9.5 × 10.25 × 20.75 in
3 × 4 in
Heavy-duty steel hanger with pre-drilled mounting holes
~$90–$120
Amcortn Hexagonal Wood Duck House
Wood
19.7 × 10.2 × 10.2 in
Dual 4 in entry holes
Pre-drilled mounting holes
~$60–$70
Amcortn 2-Pack Wood Duck Houses
Wood
17 × 10 × 10 in (each)
3 × 4 in
Pre-drilled mounting holes
~$110–$120 (2-pack)
How to Choose the Right Nesting Box
Material Durability: Cedar vs. Poly Lumber
The material you choose affects how long the box lasts and how much maintenance it needs.
Cedar has been the standard for years. It’s naturally resistant to rot and insects, stays relatively light, and blends nicely into wetland settings. With basic maintenance, a quality cedar box can easily last 10 to 15 years.
Poly lumber is made from recycled plastic and is built for longevity. It won’t rot, crack, or absorb water, so 20 years or more of service isn’t unusual. The trade-off is weight. It also tends to heat up more in direct summer sun.
If your boxes stay in a damp area year-round, I’d lean toward poly lumber. For shaded ponds and wooded wetlands, cedar remains an excellent choice.
Entrance Hole Size and Design
For wood ducks, stick with the proven standard: a 4 × 3-inch oval entrance. It gives hens enough room to enter while making access harder for larger predators.
Some boxes use a 4-inch round opening, which also works. Just avoid anything larger than that. Oversized entrances make it easier for starlings and other unwanted visitors to move in.
If starlings are common where you live, adding a starling-resistant entrance plate is a simple upgrade worth considering.
Ease of Cleaning and Maintenance
You’ll be cleaning the box every year, so don’t overlook the access door. A hinged front or side panel makes the job quick. Boxes that require removing multiple screws usually turn a five-minute task into a frustrating one.
Among the boxes reviewed above, the Woodlink WD1 stands out for its easy-opening front panel.
Mounting Options and Hardware
How you mount the box matters just as much as the box itself. A metal pole is still my first choice. It’s easier to level, simple to pair with a predator guard, and gives raccoons fewer opportunities to climb.
A tree should be your second option. If that’s your only choice, add a predator guard and inspect the mounting every year as the tree grows.
A 4×4 wooden post also works, although it won’t last as long and usually takes more effort to predator-proof.
One final detail is to tilt the box slightly forward, about 5 to 10 degrees. That small angle makes it easier for ducklings to climb to the entrance when it’s time to leave.
Predator Protection Features
Don’t judge a box by its predator claims alone. Whether the box includes extra protection or not, I still install a galvanized steel cone or stovepipe predator guard below every nest box. It’s one upgrade I never skip because it does more to stop raccoons and climbing snakes than any box design alone.
Price and Value Considerations
A higher price doesn’t always mean a better nesting box.
$70–$90: Solid cedar boxes like the Woodlink WD1 offer excellent value but usually need a separate predator guard.
$100–$150: Expect better hardware, upgraded finishes, or longer-lasting materials.
$200+: Premium models focus more on durability, craftsmanship, and long-term performance.
DIY Wood Duck Box Plans and Step-by-Step Instructions
Materials and Tools Needed
You don’t need a workshop full of equipment to build a good wood duck box. One 1 × 12 × 10-foot rough-cut cedar or cypress board is enough for a single box. You’ll also need:
1½-inch stainless steel or coated deck screws
Two 2-inch hinges
One hook-and-eye latch
Circular saw or hand saw
Drill and screwdriver
Tape measure and pencil
3–4 inches of cedar wood shavings (never fine sawdust)
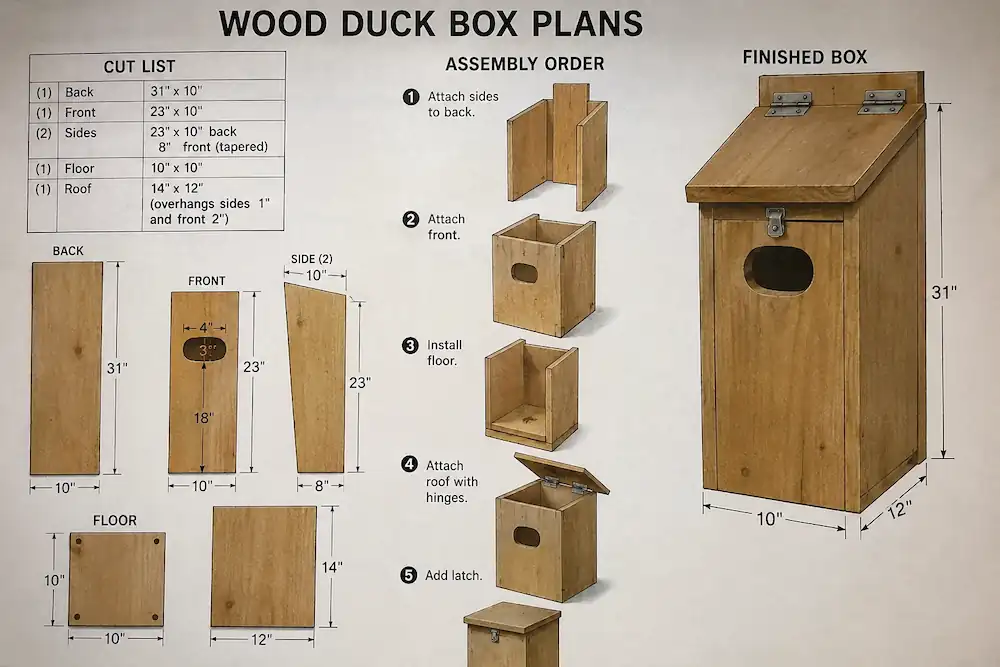
The measurements below follow plans developed by Ducks Unlimited and the Tennessee Wildlife Resources Agency, which have been used successfully for decades.
Step-by-Step Construction Guide
1. Cut All the Pieces
Start by cutting the back (31″), front (23″), two tapered sides, the 10 × 10-inch floor, and the 12 × 14-inch roof.
2. Build the Box
Fasten the sides to the back first, then attach the front panel. Leave a ½-inch gap along the top for ventilation.
3. Fit the Floor
Set the floor about ½ inch above the bottom edge before screwing it in place. Finish by drilling a drainage hole in each corner.
4. Install the Roof
Attach the roof with two hinges so it lifts open for annual clean-outs. A simple hook-and-eye latch will keep it closed.
5. Cut the Entrance
Mark the centre of the front panel and cut a 4 × 3-inch oval opening about 18 inches above the floor.
6. Add an Interior Ladder
Ducklings need a way to reach the entrance before they jump. A strip of ¼-inch hardware cloth or several horizontal saw kerfs below the opening both work well.
7. Finish the Box
Leave the inside completely untreated. On the outside, you can leave cedar unfinished or apply a non-toxic, water-based clear sealant if you want to slow weathering.
Adding a Predator Guard and Mounting Hardware
Once the box is finished, attach a metal pole bracket to the back before mounting it. Then install a galvanized steel cone predator guard about 2 to 3 feet below the box. Make sure it’s firmly secured and can’t slide down the pole.
If climbing snakes are common in your area, adding a stovepipe baffle or PVC sleeve above the cone gives even better protection.
Finishing and Weatherproofing
Cedar doesn’t need paint to survive outdoors. Over time, it’ll naturally fade to a silver-grey colour while continuing to resist rot. If you’d rather keep the original wood colour, apply a clear, non-toxic exterior wood sealer once a year.
One last thing I avoid is dark paint or stain. It absorbs more heat in summer, and a cooler nesting box is always better for eggs and ducklings.
Choosing the Right Location
If I can choose only one thing to get right, it’s the location. A pole in 1–3 feet of water is my first choice. It creates a natural barrier against many predators and gives ducklings a clear path to the water.
If that’s not possible, place the box within 100 feet of a permanent pond, marsh, or slow-moving stream. Wood ducks also like areas with nearby cattails, arrowhead, or similar vegetation where ducklings can hide after leaving the nest. If you’re still planning your setup, building a backyard duck pond first will make the area much more attractive to wood ducks.
Optimal Height and Orientation
Mount the box 6–8 feet above the water or ground and give it a slight 5–10° forward tilt.
Point the entrance toward open water and away from strong prevailing winds. In colder northern areas, a southeast-facing entrance catches the morning sun and offers better protection from cold winds.
Spacing and Density of Boxes
Don’t cluster your boxes together. Leave at least 100 feet between them whenever possible. If thick vegetation separates the boxes, you can reduce that distance to 50–75 feet. Good spacing also helps reduce dump nesting, where several hens lay eggs in the same box.
Habitat Enhancements to Attract Wood Ducks
The box is only part of the setup. Adding buttonbush, arrow arum, or smartweed around the shoreline makes the area more attractive to nesting hens. I also leave a strip of natural vegetation around the pond instead of mowing right to the water’s edge. It provides better cover for ducklings and supports the insects they feed on.
If local regulations allow it, you can also offer floating duck pellets, although natural habitat will always matter more than supplemental feeding. Knowing what ducks eat also helps you improve the area around the nesting box.
Install it by late winter, ideally between January and February. Hens usually begin looking for nest sites in early spring, so having the box ready beforehand gives you the best chance of occupancy.
Use the standard 4 × 3-inch oval entrance. It helps discourage starlings while still allowing wood ducks to enter. If starlings keep taking over, add a starling-resistant entrance plate and remove starling nests as soon as you find them.
Not right away. Some boxes sit empty for two or three seasons before a hen finally chooses them. If it still isn't being used, check that it's close to water, mounted at the right height, and not hidden in heavy shade.
Yes, but keep them at least 100 feet apart. Good spacing reduces territorial disputes and helps prevent dump nesting, where several hens lay eggs in the same box.
Leave them alone at first. A hen may return after a short absence. If there's no activity for about two weeks, remove the eggs during your next scheduled clean-out.
You can, but I only do it when a pole isn't an option. If you use a tree, add a predator guard, leave room for the tree to grow, and inspect the box every year for squirrel or raccoon damage.
David Carter, founder of Farmstead Guide, has over 20 years of hands-on homesteading experience. From raising poultry to practicing sustainable farming, he shares practical tips and insights to help others live a more self-sufficient lifestyle.