The wrong starter kit can make your first season with bees much harder than it needs to be. Missing equipment, poor-quality tools, and confusing bundles often leave beginners buying replacements before they even complete their first hive inspection.
The best beekeeping starter kit should include the essentials without filling the box with unnecessary extras. A good kit saves money, reduces frustration, and gives you the confidence to manage your first colony properly.
Before ordering bees or equipment, I recommend learning the basics of hive setup, colony management, and the tools you’ll need. Beekeeping guide for Beginners by Michael York (Check on Amazon) is a useful guide for anyone starting their first hive. It covers hive selection, equipment, inspections, colony care, and honey harvesting in a simple, practical way, helping beginners understand what to expect before bringing home their first bees.
You can also explore our guide on starting beekeeping for a practical overview of setting up your first hive and preparing for your first colony.
Below, I’ve compared the best beehive starter kits for beginners, including what each package contains, where it falls short, and which options are genuinely worth considering.
Understanding Hive Types
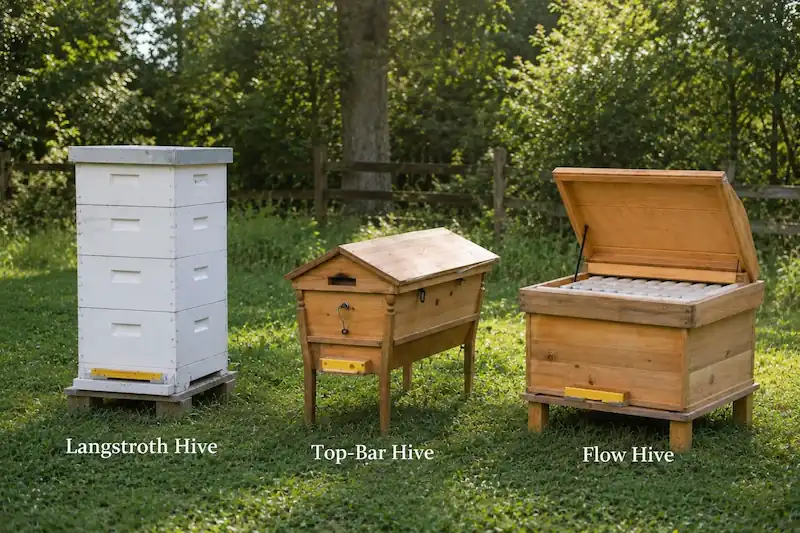
Before comparing beekeeping starter kits, decide which hive style you want to manage. Most kits are built around a specific hive type, and switching later usually means replacing equipment. For most beginners, the choice comes down to three options.
The types of bees you plan to keep can also influence your hive choice. While most beginner kits are designed for common honey bee species like Apis mellifera, different bee strains and local conditions can affect colony behavior, space requirements, and management style. Choosing the right hive setup before buying equipment makes the first season much easier.
1. Langstroth Hive: The Best Choice for Most Beginners
The Langstroth hive is the standard for modern beekeeping, and for good reason. It uses stackable boxes with removable frames, making inspections, feeding, and honey harvesting straightforward. Almost every beekeeping supplier stocks replacement parts, and it’s the hive you’ll see in most beginner classes and local beekeeping associations.
The biggest drawback is weight. A full deep box can weigh more than 80 pounds, which isn’t much fun to lift during a summer inspection. If that’s a concern, start with 8-frame equipment instead of 10-frame boxes. They’re noticeably lighter and much easier to handle without giving up much honey production.
If I were helping a first-time beekeeper buy one complete package, this is the kit I’d recommend. It includes almost everything needed to get started, so you don’t have to spend days figuring out which tools you’re missing.
The cedar hive comes wax-coated, which saves you from painting it before installation, and the joinery fits together cleanly without much adjustment. The kit also includes a beekeeping suit, leather gloves, smoker, hive tools, frame holder, entrance feeder, queen excluder, and other accessories that most beginners end up buying separately.
I particularly like that the frames use beeswax-coated plastic foundation. My colonies accepted them quickly, and the extra beeswax encourages the bees to start drawing comb sooner than bare plastic.
The protective suit is perfectly adequate for a beginner, and the smoker and hive tools perform well enough that I never felt the need to replace them during my first season. While the craftsmanship isn’t premium, everything is functional, durable, and represents excellent value for the price.
The only minor drawback is that shipping occasionally causes loose joints or small cosmetic damage. Fortunately, replacement parts are easy to obtain, and the issues are usually simple to fix.
I recommend it because it’s a genuinely complete starter package that removes the guesswork for new beekeepers and offers excellent value compared with buying every item individually.
If you already own a bee suit, smoker, and hive tools, this is one of the best value Langstroth hive kits I’ve come across.
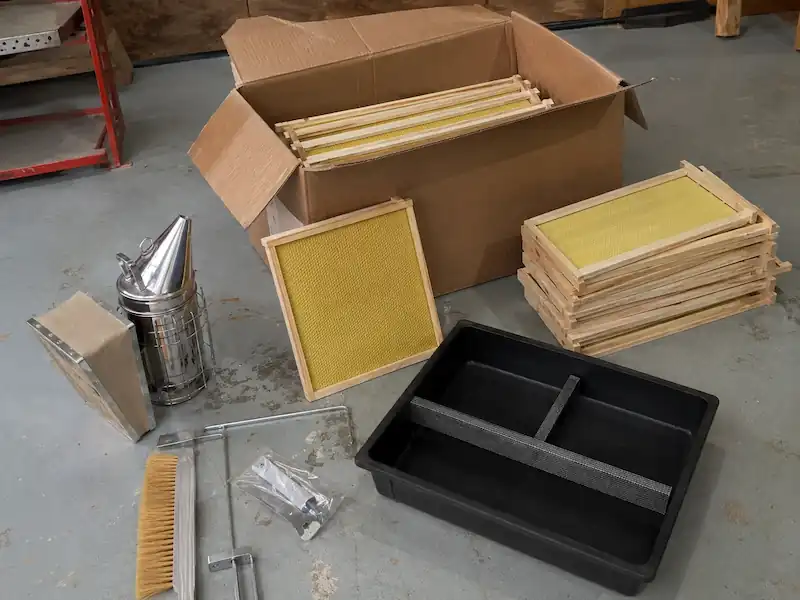
The kit includes two deep brood boxes, one medium honey super, 30 frames with beeswax-coated foundations, a bottom board, covers, queen excluder, entrance reducer, and mouse guard. Everything follows standard Langstroth dimensions, making future expansion simple.
The cedar construction feels solid, and the dovetail joints fit together tightly with very little effort. I also appreciate the factory-applied beeswax coating. It protects the wood from the weather and eliminates the need to paint the hive before introducing bees.
One thing I would add is a screened bottom board for easier varroa monitoring, but that’s true of many hive kits in this price range.
If your kit arrives with shipping damage, BeeCastle’s customer service appears to replace damaged parts promptly.
If you’re looking for a complete starter kit without spending premium money, this Honey Lake package is well worth considering. It combines a standard 10-frame Langstroth hive with the basic tools you’ll need to start your first colony.
The cedar hive arrives with the brood box already assembled, while the frames are quick to put together using the supplied nails. I like the wax-coated wood and dovetail joints, which give the hive a solid feel and help it stand up to the weather.
Alongside the hive, you get a smoker, hive tools, uncapping equipment, gloves, and a beekeeping veil. It’s enough to begin hive inspections and basic honey harvesting without immediately buying extra accessories.
The biggest compromise is the protective gear. A veil and gloves are included, but there’s no full bee suit. If you’re completely new to beekeeping or nervous about your first inspections, I’d budget for a ventilated suit as well. The extra confidence is worth it.
2. Top Bar Hive
A top bar hive is a single horizontal box where bees build natural comb from wooden bars instead of foundation. Many people choose this style because it avoids heavy lifting and can be built at a relatively low cost.
You gain a more natural setup, but hive management becomes more demanding. Natural comb is more delicate, inspections take a steadier hand, and there are fewer experienced beekeepers who can help if you run into problems. Honey production is usually lower than with a Langstroth hive.
3. Flow Hive
A Flow Hive is based on a Langstroth hive but uses specially designed plastic frames that let you drain honey without removing the frames from the hive. It’s an impressive system, but it doesn’t eliminate regular hive management.
You’ll still need to inspect the colony, monitor for varroa mites, and make sure the queen is healthy. In my experience, many beginners assume a Flow Hive reduces the work of beekeeping. It doesn’t. It simply makes harvesting cleaner and easier. The higher purchase price is another factor to consider.
Essential Components of a Beekeeping Starter Kit
A good beekeeping starter kit saves you time and money, but very few are truly complete. Before you buy, check exactly what’s included and what you’ll need to purchase separately.
The Main Parts of a Langstroth Hive
Most beginner kits are built around a Langstroth hive. These are the essential components you’ll find inside.
i. Bottom Board
The bottom board forms the base of the hive. Screened versions improve airflow during hot weather and make it easier to monitor varroa mites, while solid boards offer better insulation in colder climates.
iI. Brood Boxes
Brood boxes, often called deep boxes, are where the queen lays eggs and the colony raises brood. Most starter kits include one or two, depending on the package.
III. Frames and Foundation
Frames hold the comb where bees store honey, pollen, and brood. Foundation can be wax or plastic, giving the bees a guide to build straight, manageable comb.
IV. Inner Cover and Outer Cover
The inner cover helps regulate temperature and moisture inside the hive. The outer cover protects the colony from rain, wind, and sun.
V. Entrance Reducer
A small piece of wood, but an important one. It narrows the hive entrance so a young colony can defend itself more easily against robbing bees and wasps.
What’s Missing from Most Starter Kits
Even the best beehive starter kit usually leaves out a few essentials.
Hive Stand
Keeping the hive off the ground reduces moisture, discourages pests, and makes inspections much easier on your back. Concrete blocks work, but a dedicated stand is more stable.
Hive Feeder
New colonies need sugar syrup while they’re building comb. I prefer internal frame feeders or top feeders because they reduce robbing compared to entrance feeders.
Varroa Monitoring and Treatment
No starter kit is complete without a plan for varroa mites. A monitoring kit and an approved treatment should be on your shopping list before your bees arrive, not after.
Smoker Fuel
Don’t assume you’ll find suitable fuel on the day of your first inspection. Dry pine needles, untreated burlap, and smoker pellets all work well.
Bee Brush
A soft bee brush helps remove bees from frames when necessary, although I use it sparingly because gentle shaking is often less disruptive.
Queen Excluder
Some kits include one, while others don’t. It’s useful if you want to keep brood out of honey supers, but many experienced beekeepers manage perfectly well without it.
Assemble and paint your hive several weeks before your bees arrive. You’ll have time to fix mistakes, let the paint cure properly, and avoid rushing on delivery day.
Protective Gear: Buy It Once, Buy It Right
Protective clothing doesn’t just prevent stings. It gives you the confidence to inspect your hive without hesitation.
Full Suit or Jacket?
For most beginners, a ventilated full suit is the better investment. It protects your ankles, wrists, and legs, where many first-time stings happen.
A jacket with a veil is cooler in summer but leaves your lower body exposed unless you seal your trousers carefully. A veil on its own is rarely worth the risk if you’re just starting out.
Which Gloves Should You Choose?
Leather gloves offer excellent protection but reduce finger movement, making it easier to squash bees accidentally.
Nitrile gloves provide much better control. Bees can sting through them, but in my experience they rarely do unless they’re already defensive.
No gloves works for experienced beekeepers who are comfortable reading colony behaviour, but it’s not something I’d recommend for your first season.
Choosing a Veil
A round veil offers the best visibility and keeps the mesh away from your face.
A fencing veil packs away neatly but can press against your skin when you bend over.
A square veil is common on budget suits and works well enough, although it often feels more restrictive.
I use a ventilated full suit with a round veil and nitrile gloves. It’s comfortable during long inspections and gives me the confidence to work calmly around the bees.
BeeCastle 10-Frame Langstroth Deep Brood Box (Check on Amazon)
Not every beekeeper needs a complete starter package. Sometimes you only need an extra brood box, and this BeeCastle 10-frame deep box is a practical, affordable option.
The kit includes a cedar deep brood box, 10 frames, and wax-coated foundations, all built to standard Langstroth dimensions. The double beeswax coating is a nice touch because it protects the wood and saves the extra step of painting before use.
The dovetail joints are tight and sturdy, and the pre-drilled holes make assembly much easier. I would still recommend using wood glue during assembly, especially for frames that will eventually hold the weight of honey-filled comb.
The frames are another strong point. The foundations come with a decent wax coating, which helps encourage bees to draw comb more evenly compared with plain plastic foundation.
Keep in mind this is only a brood box kit. You will still need a bottom board, cover, hive stand, and other beekeeping equipment to create a complete hive setup.
Essential Beekeeping Tools
I. Smoker
A smoker is one tool you should never compromise on. Cool smoke masks alarm pheromones and encourages bees to focus on feeding instead of defending the hive.
Practice lighting it before your bees arrive. A smoker that goes out halfway through an inspection is frustrating at best.
II. Hive Tool
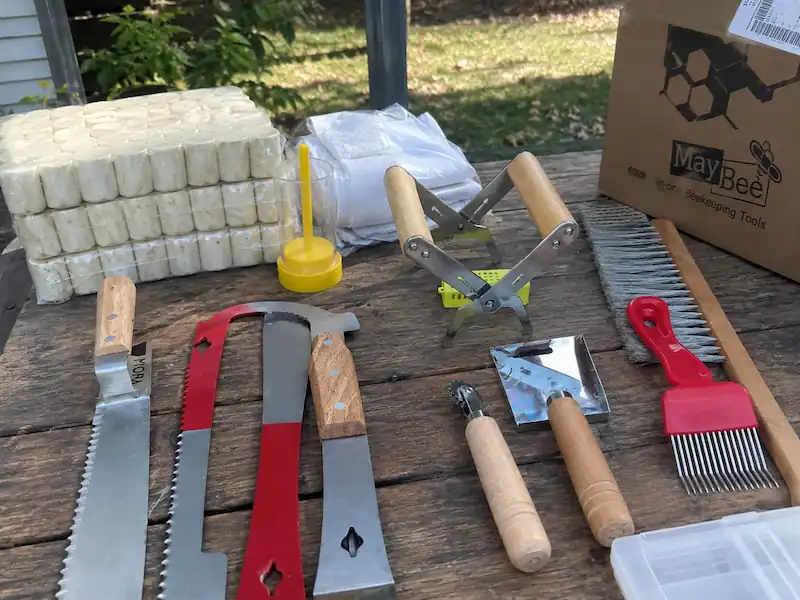
Every inspection starts with a hive tool. It separates boxes glued together with propolis, lifts frames, and scrapes away excess wax.
If your budget allows, buy both a flat hive tool and a J-hook. I also recommend keeping a spare because they have a habit of disappearing into long grass.
III. Bee Brush and Useful Extras
A bee brush is helpful for gently moving bees off frames, although it should never be used on the queen.
A frame grip makes lifting heavy frames easier, while a queen marking kit is something to consider once you’ve gained a little experience.
BeeCastle 14-Piece Beekeeping Tools Starter Kit (Check on Amazon)
Instead of paying for oversized kits packed with tools you’ll rarely touch, this set focuses on the equipment every beekeeper should keep close at hand.
The kit includes a smoker, hive grip, J-hook, L-hook, thumb hook, bee brush, uncapping tools, queen cage, queen marking tube, beetle traps, leather gloves, and a sturdy organiser tote. Everything packs neatly into the storage bag, although it’s worth knowing that the bag is tucked inside the smoker when the kit arrives.
The tools feel solid and well made, especially considering the price. I also like that the kit includes sheepskin gloves rather than the thin cotton gloves found in many budget sets. They offer better protection while still allowing enough dexterity for routine hive work.
Best Large Capacity Langstroth Hive Starter Kit
For beekeepers who want a hive they can grow into, this BeeCastle 10-frame Langstroth kit (Check on Amazon) offers more space than most beginner setups. It includes two deep brood boxes, two medium honey supers, 40 frames with wax-coated foundations, and all the essential hive components needed to build a complete colony setup.
The cedar construction and full beeswax coating are the highlights. The wax coating protects the wood from weather, removes the need for immediate painting, and gives the hive a natural finish that blends well into an apiary.
Assembly is simple due to the pre-drilled holes and dovetail joints. The boxes fit together securely, although I would still recommend using quality wood glue during assembly for extra durability, especially when boxes become heavy with honey.
One thing to keep in mind is that the factory wax coating on the foundations can be lighter than some beekeepers prefer. Adding a little extra beeswax to the foundation may help encourage more consistent comb building.
The kit does not include a hive stand, smoker, or protective equipment, so beginners starting from zero will need to purchase those separately.
First-Year Beekeeping Timeline: When to Buy Equipment and What to Do Each Month
Starting a hive is not just about buying bees and putting a box in the garden. Understanding the lifecycle of bees and how a colony develops through the seasons helps you plan inspections, feeding, and hive management at the right time. The timing matters. A little preparation before your bees arrive saves a lot of stress later.
January–February
Winter is the time to prepare, not wait. Use these months to choose your hive location, learn your local beekeeping rules, and connect with nearby beekeepers or associations. I always recommend ordering bees early because popular suppliers often run out of packages and nucs before spring arrives.
This is also the right time to buy your starter kit, protective suit, smoker, hive tools, feeder, and mite monitoring supplies.
Do not wait until March to order bees. By then, many of the best colonies are already reserved.
March–April
Your hive should be ready before your bees arrive. Assemble the boxes, frames, and equipment ahead of time. Choose a location with morning sun, good airflow, and some protection from strong winds. A southeast-facing spot is ideal in many areas because it gives bees early sunlight to start their day.
During this stage, you’ll need a hive stand, smoker fuel, and sugar for making syrup. I made the mistake of rushing hive preparation before. A freshly painted hive can still smell strongly, and bees are not fans of chemical odours. Give painted equipment at least a couple of weeks to dry and air out before installation.
May
The exciting part begins when your package or nuc arrives. Install the bees carefully, then provide 1:1 sugar syrup (the standard sugar water ratio of equal parts sugar and water) to help them build comb and establish the colony. After three to five days, check that the queen has been released and the colony has started accepting her.
During this period, I keep extra sugar and a feeder ready. A new colony needs support while it draws foundation and raises its first generation of workers.
Pollen patties can also help during periods when natural pollen is limited, although they are not always necessary.
June–August
Summer is when your beekeeping skills develop. Inspect the hive about once a week and look for signs of healthy growth:
Fresh eggs and larvae
A consistent brood pattern
Adequate food stores
Queen activity
Early signs of pests or disease
This is also when I start regular varroa mite monitoring. Do not wait until you see a failing colony. Mites often cause damage long before the symptoms become obvious.
Keep a hive inspection notebook. My records include dates, weather conditions, brood observations, temperament, and mite counts. Those notes become extremely useful when something looks wrong.
You may also need additional brood boxes or honey supers as the colony expands.
September–October
A strong colony still needs preparation before cold weather arrives. If your bees have produced surplus honey, this is the time to harvest.
However, many first-year colonies do not produce extra honey, and that is completely normal. Their first priority is building population and storing enough food to survive. Before winter, focus on:
Completing mite treatments
Checking honey stores
Adding a mouse guard if needed
Reducing the entrance
Preparing winter feed if your climate requires it
I would skip buying an expensive honey extractor during your first season unless you already know you’ll have a large harvest. Most beginners simply do not need one yet.
November–December:
Winter is a quieter time in the apiary. Avoid unnecessary hive inspections. Instead, check that the hive is secure, the cover is stable, and weather protection is adequate.
This is when I review my notes, order replacement equipment, and plan improvements for the next season. A slow winter is a good beekeeper’s advantage because it gives you time to prepare before the spring rush begins.
David Carter, founder of Farmstead Guide, has over 20 years of hands-on homesteading experience. From raising poultry to practicing sustainable farming, he shares practical tips and insights to help others live a more self-sufficient lifestyle.