Quail need clean water all the time; there’s no way around it. It affects everything: their growth, egg production, digestion, and even how well they handle heat. I’ve observed throughout, even a few hours without water can stress them out badly. You’ll notice quick changes like fewer eggs, slow growth, and a higher chance of sickness. That’s why proper watering isn’t just important, it’s critical.
Raising healthy quail successfully requires balancing all care aspects, including feeding, housing, and hydration. They come with their own set of challenges when it comes to water. Chicks can easily drown in deep or open containers, so you have to be extra careful with what you use.
Adult quail are just messy by nature; they’ll kick bedding, food, and droppings straight into their water, turning it dirty in no time. On top of that, they peck at everything, including their waterers, which can cause spills or damage.
Good quail keeping practices always focus on clean, safe, and well-designed water systems. Most experienced keepers and poultry experts agree that dirty water is one of the fastest ways diseases spread in a flock, so keeping it clean and secure should always be a top priority.
Common Water Problems That Can Make Your Quail Sick
Dirty water mixed with droppings can quickly spread diseases like E. coli, Salmonella, and coccidiosis in quail.
A slimy layer (biofilm) can build up inside waterers, and it’s basically a hidden spot where harmful bacteria grow.
If waterers sit in the sun, algae can start growing, making the water unsafe and unpleasant for quail.
Using cheap or non-food-safe plastic or metal can release harmful chemicals into the water.
One of the biggest problems I’ve faced is how fast quail turn clean water into a dirty mess with droppings.
Types of Quail Waterers
1. Gravity Waterers
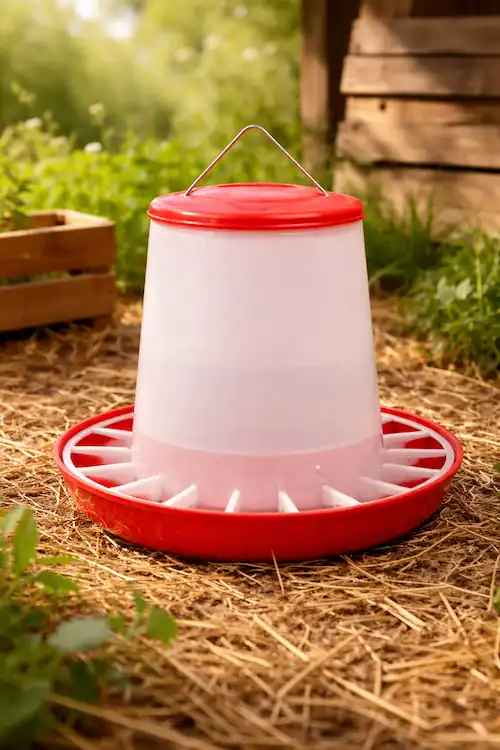
Gravity waterers are the most basic type. They usually have a bottle on top and a small tray at the bottom where water collects.
They’re cheap and easy to find, but honestly, they get dirty very quickly because quail keep kicking bedding and droppings into them. They can also tip over if not placed properly, so they’re not the best for keeping water clean.
2. Nipple Waterers
Nipple systems are one of the cleanest options out there. Water only comes out when the quail peck at the metal nipple, so there’s almost no chance of dirt getting inside. I personally use nipple waterers in my setup, and they’ve made a huge difference: less mess, less waste, and much cleaner water overall.
The only downside is that quail may take a little time to learn how to use them, and sometimes the nipples can clog if not maintained.
3. Cup Waterers
Cup waterers are a good middle option. They automatically refill when the water level drops, so quail always have access to fresh water. They’re easier for birds to understand compared to nipple systems, but they’re not completely mess-free. Some bedding or feed can still get into the cups, so you’ll need to clean them regularly.
4. Chick Waterers (Brooder-Safe)
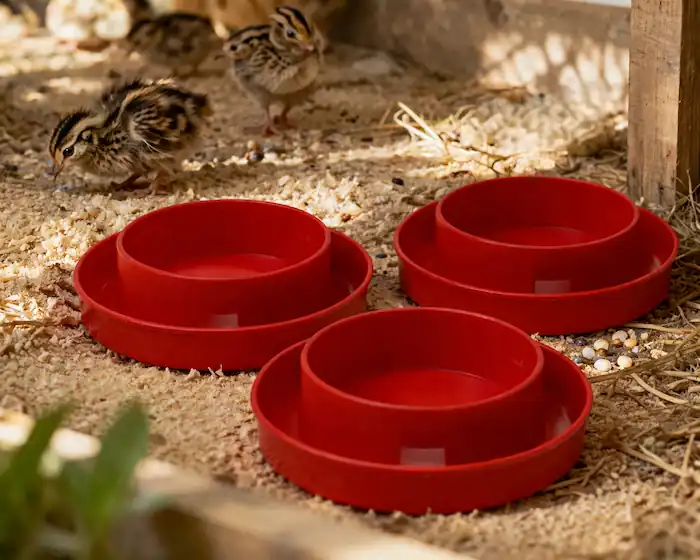
These are specially designed for baby quail. They come with very shallow bases or protective grates to prevent drowning, which is a big risk with chicks. They’re small and safe, but you’ll need to refill them often since they don’t hold much water. Also, they’re only useful for the first few weeks.
5. Open Dishes or Troughs
Open dishes might seem convenient, but they’re actually the worst option. Water gets dirty almost immediately, and chicks can easily drown in them. They also lead to a lot of water waste and increase the risk of disease. It’s best to only use them temporarily, like when giving medication.
Comparison of Quail Waterer Types
Waterer Type
Best For
Hygiene (1–5)
Maintenance
Cost (DIY vs Commercial)
Nipple System
All ages, especially large flocks
5
Low–Medium
DIY: Low Commercial: Medium–High
Cup Waterer
Small to medium flocks
4
Medium
DIY: Low Commercial: Medium
Chick Waterer
Baby quail (0–3 weeks)
4
Medium–High
Commercial: Low
Gravity Waterer
Small adult flocks
2
Medium
Commercial: Low
Open Dish/Trough
Temporary use only
1
High
Low
Choosing the Right Waterer for Your Setup
Picking the right quail waterer really depends on your setup, not just what looks good.
Your flock size and age matter a lot. A few backyard quail can manage with simple systems, but larger flocks need something more efficient like nipple or cup waterers. Chicks need extra care, so always go for shallow, safe waterers to avoid drowning.
The environment also makes a difference. Indoor setups are easier to manage, but outdoor ones need protection from heat, sunlight, and even dirt getting into the water.
Budget and time are important too. Some waterers are cheap to buy but take more time to clean every day, while others cost more upfront but save time later. I prefer setups that save me time in daily cleaning.
Space is another key factor. In small cages or brooders, compact and spill-proof waterers work best, while larger enclosures can handle bigger systems with more capacity.
At the end of the day, the best choice is the one that fits your space, flock size, and how much time you can give daily.
Buyer’s Guide: Choosing the Best Commercial Quail Waterer
Buying a good quail waterer isn’t just about price; you need something safe, practical, and easy to manage daily.
Safety should always come first. Go for designs that prevent drowning, especially if you have young birds. A stable base is also important so the waterer doesn’t tip over and create a mess.
Material quality matters more than most people think. Always choose food-grade, BPA-free plastic or stainless steel that won’t rust. Avoid cheap or questionable materials, as they can affect water safety.
You should also match the size of the waterer to your flock. Small flocks can manage with smaller capacity, but larger flocks need bigger waterers so you’re not refilling again and again throughout the day.
Cleaning is something you’ll deal with daily, so keep it simple. Look for waterers that are easy to open, clean, and don’t have tight corners where dirt and slime can build up.
Price is important, but don’t just go for the cheapest option. A slightly expensive waterer that stays clean and lasts longer will save you more effort and trouble in the long run.
It’s also a good idea to check reviews and go with trusted poultry brands. Real user experiences can tell you a lot about how well a waterer actually performs over time.
One common issue people face is water spilling or getting wasted, so always choose a design that minimizes mess and keeps water clean for longer.
Below are the recommendations, based on practical use, common poultry care standards, and what experienced quail keepers generally prefer for better hygiene and ease.
1. Little Giant Quail Waterer for My Quail Chicks
I bought the Little Giant gravity-style quail waterer (check on Amazon), specifically for my baby quail chicks because I needed something simple and ready to use without building anything.
I was genuinely happy with it. The setup was quick, and it immediately started working without any adjustments. The size was also ideal for my small brooder, and it kept a steady supply of water available for the chicks, which meant I didn’t have to worry about constant refilling.
It also felt like a safer option compared to open dishes, especially for tiny chicks, since the shallow drinking area made access easy while reducing the immediate drowning risk. Overall, it gave me a convenient, plug-and-use solution that fit well into my early brooder setup.
However, after using it for a while, I did notice a few practical limitations that are common with most gravity-style waterers rather than just this model. The main thing is that the open tray can get dirty fairly quickly in a brooder environment, so it does need regular cleaning to keep the water fresh and safe for chicks.
Also, it works best when it’s placed on a completely level surface and properly sealed, so occasional checks help ensure smooth and consistent water flow.
The RentACoop 32oz (1L) Automatic Drinker (check on Amazon) is a compact, hybrid-style quail and chick waterer designed to make daily watering easier and cleaner without much effort. It combines two drinking methods in one unit, making it a practical choice for small brooders and young birds.
I found it a convenient, “set and forget” type setup that keeps a steady water supply available while reducing the need for constant refilling. It mounts easily on cages or brooders, which helps save floor space and keeps the area more organized.
Key Features
Combines auto-fill drinking cup + horizontal nipple system in one unit
32oz (1L) capacity, suitable for chicks and small quail flocks
BPA-free material, safe for poultry use
Cage-mounted design saves space inside brooders
Cup provides easy visible water access for young birds
Nipple helps keep water cleaner and reduces contamination
Simple top-fill design for quick refilling without hassle
Works well for chicks, quail, and other small poultry
DIY Quail Waterers: Simple Solutions for Every Budget & Skill Level
DIY quail waterers are a great option if you want to save money and fully control your setup. Compared to commercial waterers, they’re usually much cheaper and can be adjusted to fit your exact flock size and cage space.
You can also use recycled materials, which makes them even more budget-friendly. On top of that, building your own setup helps you understand your birds better but just remember, it does take some time to gather materials, build everything, and test it properly.
1. Beginner DIY: Shallow Dish with Marbles (For Chicks)
This is the easiest and safest setup for baby quail. You just need a shallow dish and some clean marbles or small stones. Fill the dish with water and add marbles so the water level stays low, making it impossible for chicks to drown. I’ve seen this work really well for very young chicks when safety is the main concern.
2. Intermediate DIY: Bucket Nipple Waterer
This setup is perfect if you want something more hygienic and long-lasting. You take a food-grade bucket, drill holes near the bottom, and install nipple drinkers.
Once sealed properly, it gives a clean, drip-free water source for small to medium flocks. You just hang it at the right height and fill it up. Make sure to test for leaks before using it with your quail, and always use safe, food-grade materials.
3. Advanced DIY: PVC Watering Line System
For larger setups, a PVC pipe watering system works really well. You build a line using PVC pipes, install multiple nipple drinkers along it, and connect it to a water source like a bucket or tank.
It’s a bit more technical to build, but once installed, it needs very little maintenance and can serve a large flock easily. Proper planning and sealing are important to avoid leaks and ensure smooth water flow.
Quail Waterer for Winter
Winter is one of the toughest seasons for quail keepers because the real problem isn’t just cold weather, it’s keeping water in a liquid state. Quail need constant access to fresh water, and when temperatures drop, even a simple waterer can freeze quickly, leaving birds dehydrated and stressed.
Most experienced keepers deal with this by switching to heated water systems, insulated setups, or more frequent water changes. Heated bases or built-in heated waterers are considered the most reliable option because they automatically keep water just above freezing and reduce daily effort. In many setups, this becomes the “set and forget” solution for winter care.
If electricity is not available, insulation methods can help slow down freezing. Placing waterers in sheltered areas, using thicker containers, or keeping them inside partially enclosed coops can extend the time before water freezes. Some keepers also rotate multiple waterers throughout the day or use warm (not hot) water refills to delay freezing for a few hours.
Another important point in winter is water placement and type of waterer. Shallow and open waterers freeze faster because they lose heat quickly, while deeper containers or covered systems hold temperature longer and stay usable for more time. Wind exposure also plays a big role; waterers placed in drafty areas freeze much faster than those in sheltered spots.
A nipple and cup systems can still be used in winter, but they may need extra monitoring because nipples can freeze shut in extreme cold. That’s why many keepers either combine systems or switch to heated setups during peak winter.
In short, the best quail waterer for winter depends on your setup: heated systems for reliability, insulated or protected waterers for off-grid setups, and frequent maintenance if you’re using basic gravity or manual systems.
Maintaining Clean Quail Water: Hygiene & Health Guide
Keeping water clean is one of the most important parts of quail care, but it’s something many quail keepers often overlook because they focus more on quail feeders rather than waterers. Dirty water can quickly become a source of bacteria and disease.
Over time, a slimy layer called biofilm forms inside waterers, which protects harmful bacteria and makes it harder to clean properly. This is why contaminated water can spread serious illnesses like coccidiosis, fowl cholera, and other bacterial infections.
A well-designed cage setup plays a big role in keeping both feeders and water systems clean and accessible. While this guide covers quail waterer setup, pairing it with proper quail cage building guide, ensures better hygiene and easier daily maintenance inside any quail enclosure.
Cleaning Routine for All Waterers
Daily Care
Check water is clean and fresh
Refill when needed
Remove dirt, droppings, or debris
Make sure nipples or cups are not blocked or leaking
Weekly Cleaning
Empty and rinse completely
Scrub with a brush and mild, safe detergent
Rinse thoroughly to remove all soap
Flush nipple systems with clean water
Monthly Deep Clean
Fully disassemble waterers if possible
Soak in mild bleach solution (1:9 ratio) for about 30 minutes
Scrub to remove biofilm buildup
Rinse several times and air dry completely
Water Additives (Optional Use)
Apple cider vinegar (ACV) is sometimes added in small amounts to support gut health and help control harmful bacteria. However, it should be used carefully and waterers must be cleaned more often because it can encourage buildup.
Electrolytes and vitamins can also be added during stress periods like heat, transport, or illness, but only as temporary support, not for daily use.
Preventing Common Waterer Problems
To avoid issues like clogging, leaks, and biofilm:
Regularly flush nipple or cup systems
Use clean or filtered water when possible
Tighten seals in DIY setups to prevent leaks
Check for cracks or loose parts often
Keep waterers out of direct sunlight to slow algae growth
Stick to a consistent cleaning routine
Proper maintenance keeps your quail healthier, reduces disease risk, and ensures your water system actually works the way it should.
David Carter, founder of Farmstead Guide, has over 20 years of hands-on homesteading experience. From raising poultry to practicing sustainable farming, he shares practical tips and insights to help others live a more self-sufficient lifestyle.