How to Build a Chicken Coop?
Introduction
If you plan to buy chicks or chickens, the first thing you need to do is build a chicken coop. The idea of building a coop can feel a bit overwhelming at first, but believe me, it’s a rewarding task once you start it. And you can definitely do it if you have a little knowledge of using a hammer, saw, or other carpentry tools. If you have no prior knowledge, like I didn’t when I first started, don’t fret. This guide is here to make things easier for you.
You might be imagining confusing blueprints, long trips to the hardware store, and worrying about messing something up. A lot of beginners feel the same way. But once you get started, it’s no longer difficult or impossible.
Building My First Chicken Coop
When I first decided to raise chickens, I had no idea how to build a coop. I looked at expensive kits, watched YouTube videos, and still felt overwhelmed. But instead of buying a pre-made one, I rolled up my sleeves and started to build mine from scratch, and honestly, it turned out better than I expected.
Now, among my friends and family, I’m known for building coops. When someone in our rural area needs one, they call me, and I proudly help them build their dream coop.
In this guide, I’ll share the steps I follow, using practical tips I learned through trial and error. Whether you’re on a tight budget or want a perfect backyard fit, these hands-on tips work for you.
Whether you’re building whether a small or large coop, the basics are the same. Once you can choose the right beams, studs, and plywood, you’re set. That knowledge lets you build any size coop with confidence.
Ready to build a safe, cozy home for your chickens? Let’s get started!
Before diving into the process, let’s review key considerations for building a chicken coop.
Choose Your Build Approach
While preparing a home for your chickens, you’ll come across two options.The first is buying a ready-made coop, which I recommend only if your chickens are ready to move outside and you don’t have time to build one yourself. Ready-made options save you time and effort, but they’re often expensive and lack customization.
The next approach is to build your own coop, which is more custom and rewarding. This is the route I took, and honestly, it was worth it. Though it takes your time and effort, you end up with a personal, budget-friendly, and durable coop made exactly how you want it.
Building it yourself means you get to customize everything for yourself. Want more nesting boxes? A bigger run? A fun paint color that matches your house? You should never be worried about a DIY coop, even if you’ve never built anything before. Many people start from scratch and do just fine.
You may encounter another scenario: you’ve already bought chickens and want to build a custom coop for them, but construction will take time. In that case, there’s a middle path. Buy a small, prebuilt, or second-hand coop to serve as temporary housing. Then, take your time designing and building your dream coop on the side.
Planning Your Chicken Coop
Building a chicken coop isn’t something you do again and again; it’s a one-time activity that requires careful planning and consideration. To avoid headaches later on, it’s important to lay the groundwork before you start hammering nails.
Picking the Perfect Spot
Selecting the ideal location is crucial.
- Go for a spot that gets morning sun but stays cool with afternoon shade.
- Don’t build in a low-lying area. You don’t want puddles or mud.
- If you’re adding a heater, light, or automatic waterer, being close to water and electricity helps.
- Make sure it’s not a hassle to clean the coop or grab eggs every day.
Your town or HOA might have restrictions about where or how you build. Always double-check before starting.
How Big Should it be?
The size of the chicken coop is a separate debate, but below is a general thumb rule to help you with that.
- Inside the coop: 4 square feet per chicken.
- Outside run: 8–10 square feet per chicken.
For example, if your flock contains 5 hens and 1 rooster, you’ll need a 24 sq. ft. coop minimum and a 60 sq. ft. or run minimum.
Remember, your chicken breeds and climate might affect space needs. For example, some chickens are larger in size and more active. Similarly, free-range chickens need more space than those that stay inside the run most of the time. Climate conditions, especially harsh weather, also affect coop size.
If you’re not sure how many chickens you’ll have later, build with room to grow. A modular design or space to expand later will save time and money.
Choose Plan
Before building your chicken coop, the first step is to choose a plan. If you’re unsure which plan to pick, consider two things.
- How many birds are in your flock? and
- How much ground space is available at your home or farm?
Pick a plan that fits your flock and available space. Only you know what works best.
Let’s go through a simple example to make it clearer.
If you have 6 chickens, the plan you choose should provide at least 24 square feet of indoor space (since each chicken needs around 4 sq. ft.).
One possible option could be 4 ft. × 6 ft. = 24 sq. ft.
Other options might include 5 ft. × 5 ft. (25 sq. ft.) or even slightly larger dimensions if you plan to let your eggs hatch or add more chickens in the future.
Now, it’s up to your available yard or farm space to decide which of these plans fits best.
Coop Layout
Before starting the groundwork, draw your coop layout on paper to make it easier for yourself when marking it out on the ground.
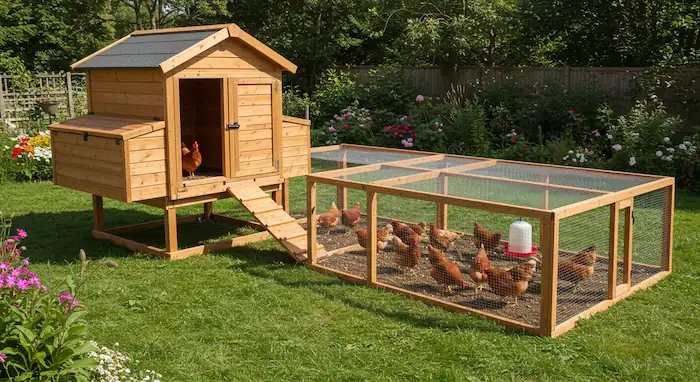
The recommended dimension for a coop of 24 sq. ft. is 4 ft. × 6 ft., and for the run, 6 ft. × 10 ft. or 8 ft. × 8 ft. is ideal. Raise the run 2 ft. off the ground, as it helps prevent flooding, provides shade for the chickens underneath, protects the wood from rotting, and deters snakes and rodents from entering the coop. Keep the run at least 6 feet tall to make it easy for you to walk in for cleaning, feeding, and maintenance.
Select the Dimensions of Beams, Studs, and Plywood
Before building a coop, I always make sure to match my plan to standard material sizes. The two most widely used materials in coop design are lumber (for beams and studs) and plywood.
The studs and beams are used for framing the coop, which usually come in 2x4s, 2x6s, or 4x4s. Choose lumber sizes that meet your coop strength and size requirements. For example, if you want a sturdier structure for a larger area, 2x6s or 4x4s may be more suitable. In our case, we used 2x4s as they met our requirements.
Depending on the length and width of your coop layout, you’ll need to cut these beams using a saw to match your specific dimensions.
It might be difficult for you to determine the exact number of beams, studs, and sheets of plywood to buy. If you have a coop plan, you can find this information accurately from there. But if you’re not confident in doing the calculations, simply show the plan to your local lumber store; they will definitely guide you. It will save you from making numerous trips to the store.
Similarly, design your coop to match standard plywood sheet sizes used for sheathing the walls and floor. Using 4 ft. × 8 ft. plywood will save time, reduce waste, and help everything fit together more efficiently. However, if you’re designing a 4 ft. × 6 ft. coop, this plywood size won’t align perfectly, and you’ll need to cut off the extra 2 ft. accordingly.
Decide if the run will be attached or separate. Also, consider future expansion.
Must-Have Coop Features for Happy Hens
Make your coop comfy and functional with these essentials:
Roosting Bars: Chickens don’t like sleeping right on the ground; they like being a bit higher up. Use rounded wooden bars and give each chicken 8–10 inches of space. More roosting space means less squabbling at bedtime.
Nesting Boxes: The boxes your hens will use for laying eggs. Make sure they’re private and cozy. One box for every 3–4 hens is usually enough.
Feeders & Waterers: Easy to access and placed where they won’t get pooped on.
Access Doors: One small door for the chickens, and at least one big enough for you to get in and clean or collect eggs.
Picking the Right Coop Design
Chicken coops come in different styles and designs. There’s no one-size-fits-all. Each design has pros and cons depending on your yard, flock size, and goals. Here’s the comparison table.
| Design Type | Pros | Cons | No. of Chickens |
| A-frame | Easy to build | Harder to clean | 2–4 |
| Tractor | Lets chickens graze | Not for cold weather | 4–8 |
| Walk-in | Spacious | Costs more | 8+ |
| Lean-to | budget-friendly | Needs structure to attach | 3–7 |
Materials List
Lumber (Wood Stuff)
- Framing wood: Like 2x4s or 2x2s, they are the bones of your coop.
- Siding wood: Plywood, T1-11 panels, or even old reclaimed wood.
- Roosting bars: Use 2x4s with smoothed edges or strong tree branches.
- Nesting box wood: Any sturdy wood that fits the job.
Plywood
- For the floor.
- For the walls (if you’re not using other siding).
- To go under the roof.
Hardware Cloth
A hardware cloth keeps out sneaky predators like rats and weasels. Use 1/2-inch galvanized hardware cloth. It’s way stronger than chicken wire. Hardware cloth can be expensive than wire, but it’s way more secure.
Roofing Materials
- Metal panels, must be corrugated.
- Asphalt shingles like on houses.
- Tar paper or roofing felt for waterproofing under the top layer.
Fasteners & Hardware
- Exterior screws in different sizes, they hold everything together.
- Nails for siding and frames.
- Hinges for doors and nest boxes.
- Latch locks; make sure all doors close tightly.
- Staple gun + staples for attaching hardware cloth.
Other Must-Haves
- Caulk/sealant to seal up gaps from weather or bugs.
- Paint or wood stain for looks and protection.
- Vinyl or linoleum flooring makes cleanup easy.
- Vents or screens for airflow, as chickens need to breathe too.
Tools
Measuring & Marking Tools
- Tape measure; you’ll use this a lot.
- Level to make sure nothing’s crooked.
- Speed square helps with marking perfect angles.
- Pencil for marking cuts.
Cutting Tools
- Circular saw for cutting big pieces of wood.
- Jigsaw for cutting curves or small spaces.
- Hand saw for small or quick cuts.
- Tin snips or wire cutters for cutting hardware cloth.
Drilling & Fastening
- Cordless drill/driver
- Drill bits & driver heads; make sure you have the right sizes.
- Hammer
- Staple gun for securing hardware cloth.
Safety Items
- Safety glasses keep dust and splinters out of your eyes.
- Gloves protect your hands from cuts or blisters.
- Ear protection (power tools can be loud).
- Dust mask, especially when cutting wood or sanding.
Other Handy Tools
- Utility knife for quick trims or clean cuts.
- Caulk gun for applying sealant.
- Wheelbarrow to move materials easily.
- Shovel, helpful for digging a trench to bury hardware cloth for predator protection.
You’d not necessarily need to buy these tools, especially the safety items and fasteners, from the market. Most of these items are already available at home. If not, you can borrow them from friends or buy second-hand items.
Step-by-Step Construction Guide
To make the whole process of building a chicken coop simple and easy to understand for you, I’ve broken it down into four phases.
Phase A: Foundation & Framing
The first stage of designing the coop involves ground formation, design of base frames, erection of wall frames, and installation of roof rafters or trusses.
Step 1. Prepare the Ground and Foundation
Start with picking a good spot for your coop, like the one mentioned above. Clean the area of weeds and rocks. Use a level to make the ground as flat as possible.
Next, mark the ground according to your chosen plan. Hopefully, you’ve already done the paperwork before marking the ground. Make the markings just as you did on paper. Use a measuring tape and a speed square to draw straight lines and perfect angles.

Don’t forget to raise the coop slightly off the ground by setting it on concrete blocks, treated wood posts, or skids. This keeps it dry, allows for airflow underneath, and discourages burrowing animals like rats.
Step 2. Build the Base Frames
A frame is like a skeleton that supports the floor of your coop, so it needs to be strong and perfectly square. Use treated 2x4s or 2x6s lumber for the frame. All the cuttings of studs and beams should be done as per your chosen plan. Make ensure all corners are square at 90 degrees using a speed square or by checking diagonal measurements.

Add floor joists for extra support. Once the frame is complete, attach it securely to your foundation using screws or brackets, depending on your chosen support system.
Step 3. Erect the Wall Frames
Next, build each wall one at a time on the ground before lifting it up. Use 2x4s for vertical studs spaced 16″ apart. Leave gaps for doors and windows. Secure each wall to the base frame, then to each other. If you’re working alone, temporarily brace the walls with diagonal boards to hold them upright.

Step 4. Install Roof Rafters or Trusses
The roof might sound tricky, but it’s totally doable. You can buy pre-made roof trusses, but they might not fit in your case. So, make simple rafters using 2x4s cut at angles. Use metal brackets or gussets to secure them. Make sure everything is spaced evenly and securely fastened. Consider adding an overhang to help keep rain away from the walls.
Phase B: Enclosure and Flooring
At this stage, you’ll give your coop the look of a real building. This involves attaching the floor where your chickens will walk, closing up the wall frames to keep out wind and predators, and finally topping it off with a proper roof to keep the rain out.
Step 5. Attaching the Floor (Plywood Sheets)
Once your base frame is level and sturdy, it’s time to install the floor. Lay down ¾-inch exterior plywood over your floor frame. Try to align the edges tightly so there are no gaps where dirt or water can get in. To keep the plywood sheets in place, screw or nail them into the framing securely, ideally every 6–8 inches along the edges and about every 12 inches in the center.
I also add a layer of linoleum or peel-and-stick vinyl over the plywood to make cleaning up poop and spills much easier later on.
Step 6. Installing the Walls (Siding)
Now cover the wall frames with siding or exterior-grade plywood. I use T1-11 siding (a type of grooved plywood that looks nice and adds structure). You can also use regular exterior-grade plywood or tongue-and-groove boards.
All you have to do is cut the panels to size so they fit perfectly from the base to the top of your wall frames. Attach the panels with exterior screws or nails, ideally into every stud for a strong hold.
Once the siding is up, seal the seams using exterior-grade caulk. Pay special attention to the corners, edges, and areas around window or door cutouts.

Step 7. Roofing Installation
The roof protects your flock from all types of weather, so it needs to be solid and watertight. There are a few popular roofing materials to choose from.
There are a few roofing options depending on your style and budget:
- Asphalt shingles à traditional, affordable, and good-looking
- Corrugated metal panels à long-lasting
- Ondura or polycarbonate roofing à lightweight and easy to install
Steps to Design Roofing
Cover your roof deck (usually plywood or OSB) with roofing felt or tar paper. This provides waterproofing beneath your final roofing layer. Next, install your roof covering. For shingles, start at the bottom edge and work upward, overlapping each row. For panels, lay them starting from one end, overlapping the edges to channel water down and away.
Make sure the overhang is sufficient, usually 6 to 12 inches, to direct rain away from the coop walls. Don’t forget to cap the ridge (the top point) with flashing or a ridge cap to prevent leaks where both sides of the roof meet.
Phase C: Doors, Windows & Ventilation
Once the walls and roof are up, it’s time to give your chickens and yourself a way in and out.
Step 8. Build Doors
You’ll need at least two doors on your coop:
- A main access door for yourself, so you can step in to clean, feed, or collect eggs.
- A small pop door for the chickens.
Use 2×2 or 2×4 boards to make a frame, then screw on some plywood to cover it. It doesn’t have to be fancy, just solid. Use strong hinges and latches to keep raccoons out. I prefer adding a sliding latch with a carabiner clip for extra predator-proofing.
Step 9. Install Windows & Vents
Now, let’s talk about ventilation. Chickens poop a lot even while they sleep. Never sacrifice ventilation, as stuffy coops can cause respiratory issues. Chickens release moisture through breathing and droppings. All that moisture needs to escape to keep your flock healthy. If not, it can cause frostbite in winter and respiratory problems year-round.
To ensure proper ventilation, place vents high on opposite sides of the coop to allow cross ventilation. If you want more natural light inside the coop, consider installing small plexiglass or reclaimed windows.
Don’t leave any openings exposed; instead, cover all of them with hardware cloth (not chicken wire!) to keep out predators.
Phase D: Inside Setup
You might be celebrating finishing the coop, but it’s not done until the inside setup is complete. Many beginner chicken keepers overlook this phase. I always advise: focus on the inside setup. This is where your chickens sleep, lay eggs, and spend time. A proper setup helps hens feel safe and secure.
Step 10. Installing Roosting Bars
Chickens like to roost above the ground, not even in nesting boxes. On our Carter Farm, our free-ranging chickens used to sleep on tree branches. So, installing roosting bars is essential to provide them with a natural sleeping spot.
Use 2x4s laid flat so their feet can rest comfortably, especially in winter. Place the bars about 18–24 inches off the ground, and leave 12–14 inches of space per bird.
Step 11. Building & Installing Nesting Boxes
Nesting boxes serve as secure, private cubbies for egg-laying. Give hens a quiet, hidden space so they can lay eggs comfortably.
You’ll need one box for every 3–4 hens. They’ll often share and take turns using the same box, even if more are available. Each box should be about 12″x12″. You can build them from scrap wood or even repurpose plastic crates. Fill the boxes with sawdust or straw to pad the eggs and prevent them from cracking under pressure.
Place nesting boxes lower than roosts. Chickens prefer the highest sleeping spot, so high boxes encourage them to sleep and lay eggs there.
Step 12. Build a Run
Once you’re done building the coop, building a run is pretty easy. Just like with the chicken coop, start by preparing the ground for the run. Then begin by building the frame. Use 2x4s or 2x2s to create a solid rectangular or square structure that’ll hold up over time.
If you want to be able to walk inside, aim for a height of at least 6 feet. For a smaller run, three to four feet can work if you’re building on a budget. However, I always prefer a taller run, as it benefits both the chickens and the keeper.
To support the frame, secure posts at all four corners. If you’re building a larger run, you’ll need to add extra intermediate posts at equal distances for additional support. Look for scrap lumber, old fence posts, or even pallet wood to build a budget-friendly chicken run. Just make sure the wood is in good condition and not rotting.
In my case as discussed earlier in this blog, I built a run for 6 chickens, which requires around 60 square feet of space. I chose a layout of 10 ft. × 6 ft. For this setup, I didn’t need intermediate posts because I used 2x4s studs, which provide enough support for this perimeter.
However, if I had used 2x2s studs, I would have needed to install an extra intermediate post on each of the longer sides.
As a general rule of thumb, here’s a quick table based on our trial-and-error approach to help guide your need for intermediate posts.
| Run Length | Intermediate Posts Needed? |
| Up to 8 ft | Usually no |
| 8–10 ft | Yes if use a 2x2s studs |
| 10–12+ ft | Yes, at least 1 per long side |
| 16+ ft | Add every 6–8 ft |
Now comes the real security: the hardware cloth. Wrap it around the sides and the top of your frame. Yes, the top too! Hawks love a chicken buffet. Use staples or fencing staples to fix it tightly to the wood.
Ensure the hardware cloth does not block sunlight or rain. For weather protection, cover about one-third to one-half of the run’s roof with solid panels or metal sheets.
To stop digging predators like foxes and dogs, make a small trench along the outer edges and lay down an apron of hardware cloth about 10–12 inches deep, extending it outward a bit. Now for the door, build a simple wooden frame and cover it with the same hardware cloth. Hang it securely and don’t forget a solid latch.
Phase 5: Finishing Touches & Final Inspection
Hot weather can reduce the lifespan of wood and also harm the health of your chickens. To protect your coop from extreme weather, use outdoor paint or stain to seal all exposed wood. Paint both the outside and inside for a longer lifespan. If you live in a hot area, choose light colors to help reflect heat.
Before your chickens move inside the coop, ensure the following.
- Walk through every inch of the coop
- Wiggle things to test strength
- Check for exposed screws, nails, or sharp corners
- Make sure it’s dry, secure, and cozy
Maintenance & Cleaning
Daily To-Dos
- Collect the eggs
- Check their food and water
- Quickly clean up any droppings you see
Weekly Jobs
- Change out the dirty bedding
- Wipe down the roosting bars
- Look around for any signs of bugs or damage
Monthly Deep Clean
- Take out all the bedding
- Scrub the walls, floor, roosts, and nesting boxes
- Use a pet-safe cleaner to disinfect everything
Seasonal Checkups
- Make sure the coop is strong and ready for cold or hot weather
- Fix any leaks or broken parts (like the roof or walls)
- Watch out for pests like mites and lice
- Repaint or stain the wood if it starts to look worn
- Replace any rusty or broken hardware


