A good bee feeder does more than hold syrup. The right feeder can keep bees fed without drowning them, triggering robbing, or leaving syrup to mold. The wrong one can create problems inside an otherwise healthy hive.
The choice is not simple. You’ll find top feeders, frame feeders, entrance feeders, mason jar feeders, pail feeders, and other hive-feeding setups.
They all have different strengths. A feeder that works well for a strong colony in warm weather may be a poor choice for a small nuc or a hive preparing for winter.
After more than a decade of keeping bees, we’ve found that feeder design matters more than it first appears.
Some are easy to refill and keep bees out of the syrup, while others create unnecessary problems. Here, we’ll compare the main types and explain which situations each feeder suits best.
You’ll see which feeders are easiest to refill, which reduce drowning, which hold enough syrup for a large colony, and which designs we would skip.
We’ll also cover the practical details that matter once a feeder is on the hive, including robbing, mold, access to the brood nest, and feeding during colder weather.
Let’s start with the main types of bee feeders and what each is best suited for.
Best Bee Feeders: Top Picks by Type
The best bee feeder depends on where you want the syrup, how much your colony needs, and how often you want to open the hive.
A frame feeder keeps the feed inside the brood box. A top feeder gives you much more capacity and easier refills. Entrance and mason jar feeders are inexpensive, but they put feed closer to the hive entrance.
Bee Feeder Type
Best For
Capacity
Robbing Risk
Refill Ease
Frame Feeder
In-hive feeding, nucs
Medium–High
Low
Moderate
Top Feeder
Large colonies, heavy feeding
High
Low
Easy
Entrance Feeder
Short-term feeding, small colonies
Low–Medium
High
Easy
Pail/Bucket Feeder
High-volume, budget feeding
High
Low
Easy
Mason Jar Feeder
DIY, small colonies
Low
Medium–High
Easy
If you are buying a feeder rather than making one, these are the designs worth considering.
1. Frame Feeders
Best for: In-hive feeding, nucs, and colonies that need syrup protected inside the hive.
A frame feeder replaces one or more frames in the brood box. That makes it a good choice when you want the syrup inside the colony rather than sitting above the inner cover or outside the entrance.
The main advantage is protection. Robbing bees have a much harder time getting to syrup inside the hive, and the feeder stays close to the colony.
Its downside is equally simple: every gallon of syrup you add takes up space that could otherwise hold a frame of brood, honey, or comb.
Division board feeders belong in this same category. They are essentially frame-shaped reservoirs designed to hang from the frame rests.
Some are built with internal ladders or textured surfaces to give bees a safer route to the syrup.
Our Pick: Beecastle Bee Pro Feeder
The BeeCastle Bee Pro Feeder (Shop on Amazon) stands out if you want a large in-hive reservoir without constantly topping it off. Its listed capacity is about 6.5 liters, and the design occupies roughly the space of two to three deep frames.
That is a lot of feed for a frame-style feeder. It also has two internal ladders with grooves, giving bees a defined route to the syrup rather than leaving them to climb directly against a smooth reservoir wall.
This feeder arrives assembled, which is useful if you want something you can fill and install without putting together another hive component.
Its trade-off is space. A feeder this large takes several frame positions, so we use it when feeding capacity matters more than keeping every frame available for brood or stores.
Best for: Beekeepers who want substantial syrup capacity inside a deep hive.
What we like: Large reservoir, internal access ladders, and no separate assembly.
Watch out for: It is designed for deep equipment and occupies multiple frame positions.
A Smaller Option: HiveSweet 3.5L Frame Feeders
If you do not need a 6-liter-plus reservoir, the HiveSweet 3.5L frame feeders (Shop on Amazon) are the more practical option. This four-pack gives you several feeders for multiple colonies or spare replacements, and each feeder is designed to occupy about two deep-frame positions.
The smaller capacity makes more sense for routine feeding where you are already visiting the apiary regularly. You are not giving up as much hive space as you would with a larger reservoir, either.
Best for: Multiple hives, smaller feeding jobs, and beekeepers who want spare feeders on hand.
What we like: Four-pack format and smaller footprint than the larger Bee Pro design.
Watch out for: You will refill them more often than a high-capacity feeder.
2. Top Feeders
Best for: Large colonies, heavy syrup feeding, fall preparation, and anyone who hates opening the hive just to refill a feeder.
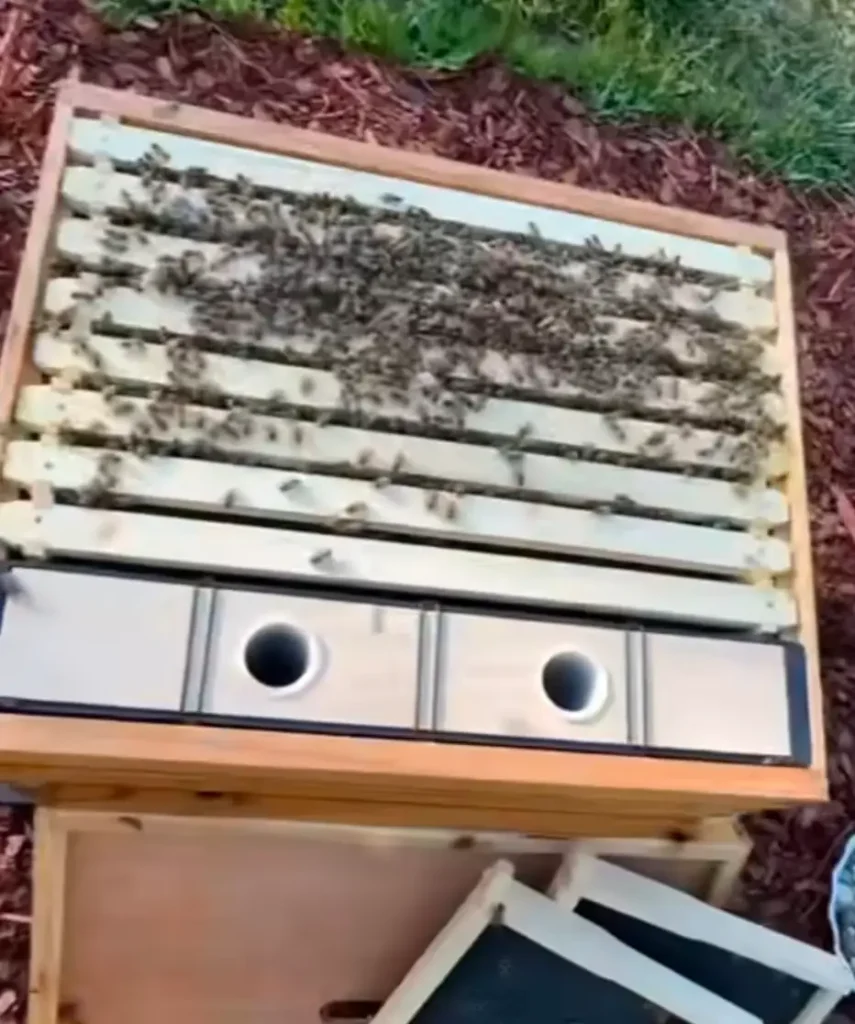
A top feeder is the easiest choice when capacity and access are your priorities. It sits above the upper hive box, normally beneath the outer cover, with bees reaching the syrup through a protected access area.
The big selling point is refill convenience. You can add syrup from above without pulling frames out of the brood box. That matters when a colony is being fed heavily and you are making repeated visits.
The Mann Lake version is particularly practical because the 10-frame model holds up to 4 gallons, while the 8-frame version holds up to 3.2 gallons. Its galvanized steel safety screen separates the bees from the main reservoir, and the single-piece plastic insert is designed to reduce leaks.
If you want one feeder that makes regular syrup feeding easier, this is the type we would put near the top of the list.
The capacity is the biggest advantage. Four gallons is enough to make a meaningful difference during heavy feeding, especially when you are preparing a strong colony for winter.
You also avoid repeatedly opening the brood chamber just to pour in another batch of syrup.
Its steel safety screen is another feature we prioritize. This feeder can hold plenty of syrup, but that does not matter if bees can easily fall into it.
Mann Lake’s design keeps the bees in the access area while separating them from the main reservoir.
There is one catch: you need enough room above the hive to house the feeder. The complete version includes a 4-5/8-inch super, so it adds height to the setup.
Best for: Heavy spring or fall feeding and large colonies.
Why buy it: High capacity, easy refilling, and a dedicated safety screen.
Watch out for: Extra height and the need to keep the feeder clean and properly seated.
Budget Alternative: KAGZ 1.5-Gallon Hive Top Feeder
The KAGZ top feeder (Shop on Amazon) makes more sense if a four-gallon reservoir is simply more than you need. It holds about 6 liters, fits 10-frame Langstroth equipment, and uses an enclosed access area with anti-drowning sponge rings.
The smaller reservoir is easier to manage for a backyard hive that does not consume several gallons of syrup at a time. You also get a transparent cover, which makes it easier to see what remains without opening the feeder completely.
We choose this over a basic open reservoir if you want the convenience of a top feeder without paying for the largest capacity.
Best for: Backyard beekeepers and moderate feeding.
Why buy it: Smaller capacity, transparent access area, and a relatively compact setup.
Watch out for: A smaller reservoir means more frequent refilling for colonies that consume syrup quickly.
3. Entrance Feeders
Best for: Short-term feeding, new colonies, and beekeepers who want to see syrup consumption without opening the hive.
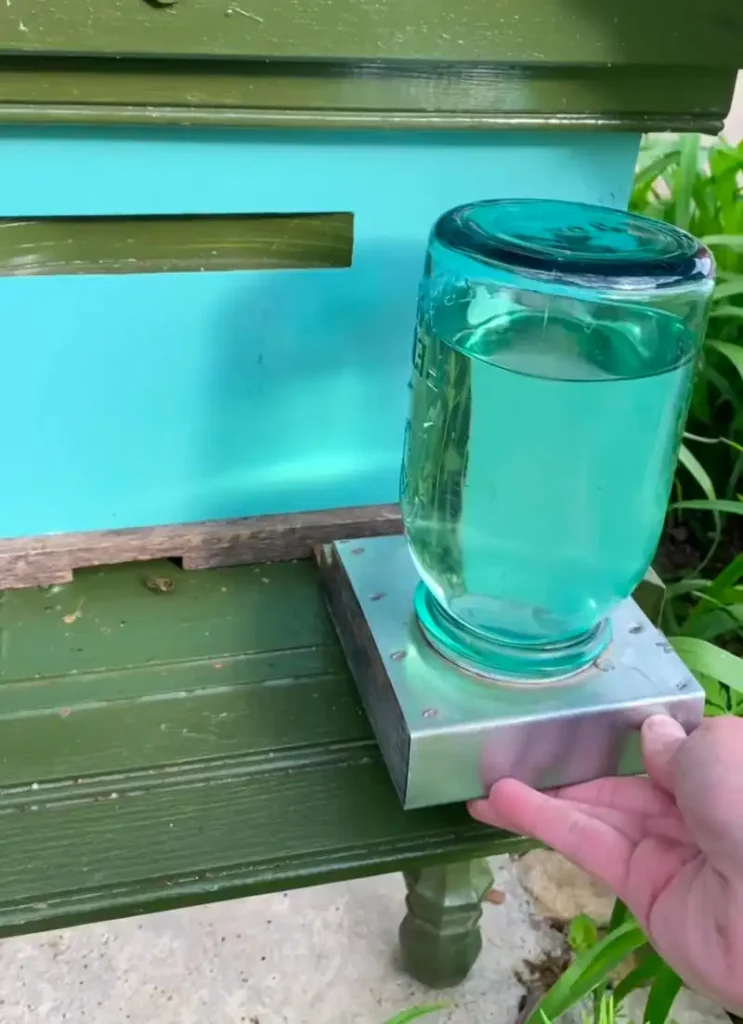
Entrance feeders are about as simple as bee feeders get. A jar or reservoir sits at the hive entrance, and bees reach the syrup through a small feeder base.
Its convenience is obvious. You can check the jar from outside and refill it without lifting the inner cover.
Its syrup at the entrance is more exposed to other insects and robbing bees than syrup kept inside the hive.
We use an entrance feeder selectively, especially when robbing pressure is high, rather than relying on it as the main feeder for every colony.
Best Simple Option: KOHAND Entrance Feeders
The KOHAND set (Shop on Amazon) is aimed at beekeepers who want multiple entrance-feeder bases and already have suitable jars. The plastic bases accept jars with perforated lids, allowing you to see the syrup level and refill without opening the hive.
Most users will find the 12-pack particularly useful if they manage several hives. You can keep the bases installed on multiple colonies instead of moving a single feeder from hive to hive.
Best for: Multiple hives, temporary feeding, and inexpensive entrance setups.
Why buy it: Low cost per feeder and easy visual monitoring.
Watch out for: Syrup is positioned directly at the hive entrance, so robbing deserves close attention.
Larger Entrance-Feeder Option: Foxhound Bee Co Half-Gallon Feeder
The Foxhound Bee Co feeder (Shop on Amazon) solves one of the biggest complaints about small entrance feeders: constant refilling.
Its reservoir holds 70 fluid ounces, or about half a gallon, giving you considerably more capacity than a typical small mason jar. Its transparent container also lets you see consumption without disturbing the colony.
Another useful feature of this feeder is its compatibility with Boardman-style feeder bases. That makes it a better fit if you already use that style of entrance feeder.
We consider this when you want the convenience of entrance feeding but do not want to refill a tiny jar every day.
Best for: Longer feeding intervals and backyard colonies.
Why buy it: 70-ounce capacity and easy visual monitoring.
Watch out for: It still carries the basic drawback of entrance feeding: the syrup is close to the entrance.
4. Pail and Bucket Feeders
Best for: High-volume feeding without buying a specialized top-feeder reservoir.
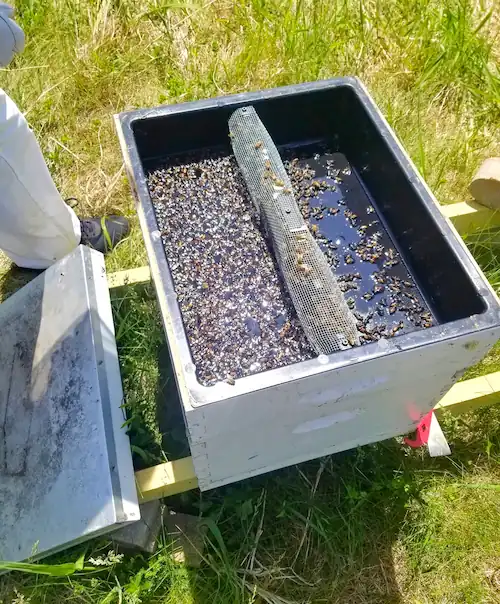
A bucket feeder takes a different approach. Instead of permanently integrating the reservoir into a hive box, you use a bucket with a screened or perforated lid, invert it over the inner-cover opening, and enclose it with an empty super.
For beekeepers searching specifically for a bee bucket feeder, pail feeder, or 5-gallon bucket bee feeder, this is one of the simplest high-capacity options.
The attraction is capacity. You can fill a bucket with a substantial amount of syrup and let the bees work from underneath. You also avoid putting the syrup directly at the entrance.
Best Value: Little Giant 2-Gallon Plastic Bucket Bee Feeder
The Little Giant bucket holds 2 gallons and is designed to sit over the inner-cover opening. Its lid provides the feeding surface, while the bucket itself becomes the syrup reservoir.
At around 2 gallons, it is large enough for serious feeding without jumping all the way to a much larger 5-gallon setup. That makes it a reasonable middle ground for a backyard beekeeper with one or several colonies.
It is also inexpensive compared with a complete wooden hive-top feeder. However, an inverted bucket needs an empty super or suitable enclosure around it before you can put the outer cover back on. It works well, but the setup takes up more space and is less compact than a dedicated top feeder.
Best for: Affordable, high-capacity feeding.
Why buy it: Two-gallon capacity at a relatively low price.
Watch out for: You need enough vertical space to enclose the bucket, and the lid needs to remain properly seated.
5. Mason Jar Feeders
Best for: Small colonies, occasional feeding, DIY setups, and inexpensive syrup monitoring.
A mason jar feeder is the simplest route if you already have suitable jars at home. The basic idea is straightforward: fill the jar with syrup, secure a perforated lid or feeder cap, invert it, and let the vacuum hold the syrup in place.
The real advantage is visibility. A clear jar tells you exactly how much syrup the colony is taking without opening the hive.
You can also buy feeder caps separately, which makes this one of the easiest bee feeder DIY options to set up without building a feeder from scratch.
Best Simple Jar Setup: Aukbeefun Mason Jar Feeders
The AukBeeFun feeders (Shop on Amazon) are designed around standard mason jars rather than requiring a proprietary reservoir. The aluminum cap and sealing ring are intended to maintain a vacuum and limit uncontrolled dripping.
That makes them useful if you already have jars available and want to turn them into dedicated bee feeders.
The six-pack is especially practical for multiple hives. You can prepare several jars at once and keep a few feeder caps as replacements.
Best for: DIY-minded beekeepers, small colonies, and low-cost feeding.
Why buy it: Reuses standard mason jars and gives you a visible syrup reservoir.
Watch out for: Jar capacity is limited, and a poorly sealed or oversized hole can turn a feeder into a syrup leak.
Entrance-Compatible Mason Jar Feeder
If you specifically want a mason jar bee feeder that fits at the entrance, the Aukbeefun entrance model (Shop on Amazon) is another inexpensive option.
It uses a feeder base and aluminum cap that accept standard wide-mouth-style jars.
This setup is convenient when you want to monitor syrup from outside the hive. It also means you can change the jar without opening the colony.
We reserve this style for situations where entrance feeding makes sense. If robbing pressure is already high, an internal or top feeder is the better direction.
Best for: Simple entrance feeding with jars you already own.
Why buy it: Cheap, reusable, and easy to monitor.
Watch out for: Entrance placement makes robbing management more important.
Which Bee Feeder Should You Buy?
If you want one feeder for regular syrup feeding, start with a top feeder. It gives you the capacity and refill access that become valuable once a colony is consuming syrup quickly.
Choose a frame feeder when keeping the syrup inside the hive is more important than preserving every frame position.
Go with an entrance feeder when you need something cheap, simple, and easy to monitor, particularly for short-term feeding.
Choose a bucket or pail feeder when you want lots of syrup capacity without paying for a dedicated top-feeder system.
And if you want the cheapest route into DIY bee feeding, a mason jar feeder is hard to beat.
The important point is not to buy the largest feeder simply because it holds more syrup. Match the feeder to the colony’s consumption, the season, and how often you can safely check it.
How We Choose These Bee Feeders
We choose bee feeders based on how practical they are for real hive management, not just how much syrup they can hold. Some of the feeders featured above have been used by us, while others were evaluated by comparing their design, capacity, ease of use, and suitability for different feeding situations.
We also checked beekeeper reviews and discussions across different communities to see how these feeders perform in everyday use. This helped us look beyond product descriptions and identify common strengths, drawbacks, and issues that may not be obvious from the manufacturer’s specifications.
For each feeder, we considered:
Capacity: How much syrup it holds and how often it may need refilling.
Ease of use: How simple it is to fill, install, inspect, and clean.
Bee access: Whether bees can reach the syrup safely without excessive drowning risk.
Robbing risk: How exposed the syrup is to bees from outside the colony.
Hive space: Whether the feeder takes up valuable frame or super space.
Build quality: Materials, construction, and how well the design is suited to repeated use.
Best use: Whether the feeder makes more sense for small colonies, heavy feeding, new packages, or routine maintenance.
We do not consider one feeder to be the best for every hive. A small mason jar feeder can be perfectly adequate for occasional feeding, while a high-capacity top feeder makes much more sense when a strong colony needs large amounts of syrup.
Our recommendations reflect those differences rather than simply choosing the most expensive or highest-capacity option.
If you’re still putting together your basic equipment, our beekeeping starter kit guide covers the essential tools and supplies you’ll need before choosing individual equipment such as a bee feeder.
DIY Bee Feeder Options
A homemade feeder can cover a short-term feeding need without requiring another commercial hive component. These three setups use common materials, but each works best in a different situation.
Mason Jar Feeder Over the Inner Cover
To make this feeder, you’ll need a pint- or quart-sized mason jar with a lid, a small nail and hammer for creating the feeding holes, plus an empty deep super or shim to provide space around the inverted jar.
How to make it:
Use the nail to make 6–8 very small holes in the lid.
Fill the jar with 1:1 or 2:1 syrup and tighten the lid firmly.
Turn the jar upside down over the inner-cover opening. If syrup runs out freely, the holes are too large.
Place an empty super around the jar and put the outer cover back on.
Pros: Cheap, easy to check, and low drowning risk.
Cons: Limited capacity, breakable glass, and not a practical choice for heavy feeding.
Stainless-steel or plastic-coated lids hold up better than untreated metal lids. Replace worn lids rather than continuing to use corroded ones.
Plastic Container Feeder
For this DIY feeder, gather a food-grade plastic container with a secure lid, a piece of window screen or fine hardware cloth, a sharp knife for modifying the lid, and food-safe adhesive for securing the screen.
How to make it:
Cut an opening in the lid while leaving roughly a 1-inch border around the edge.
Cut the screen slightly larger than the opening.
Secure the screen firmly over the opening with food-safe adhesive.
Add syrup, close the lid, and turn the container upside down over the inner-cover opening.
Surround the container with an empty super before replacing the outer cover.
Pros: More capacity than a mason jar, inexpensive, and quick to refill.
Cons: Plastic exposed to sunlight can deteriorate, and the screen needs to stay clean enough for bees to access the syrup.
Use only a food-grade container intended for contact with liquids. Avoid repurposing containers made from unknown plastics or those that previously held chemicals or non-food products.
Boardman-Style Jar Feeder
You’ll need: A glass jar, a Boardman-style feeder base, and a nail.
How to make it:
Make several tiny holes in the jar lid with the nail.
Fill the jar with syrup and screw the lid on securely.
Invert the jar into the feeder base.
Position the base at the hive entrance so bees can reach the syrup.
Pros: Very inexpensive, simple to inspect, and easy to assemble.
Cons: Syrup sits directly beside the entrance, increasing the chance of robbing. Its small reservoir also requires frequent refills.
We keep this setup for short-term feeding when robbing pressure is low rather than using it as a routine feeder during a nectar dearth.
Feeder Maintenance and Hygiene
Clean feeders help prevent mold, fermentation, and contamination from affecting the colony.
Clean after use: Empty leftover syrup, rinse with hot water, and scrub the reservoir, corners, and bee-access areas. Let the feeder dry completely before storing or refilling.
Clean between seasons: Wash feeders thoroughly and sanitize them according to the material and manufacturer’s instructions. Rinse well and allow them to dry fully.
During extended feeding: Check feeders regularly for mold, cloudy syrup, leaks, or fermentation. Do not keep questionable syrup in the hive.
Use fresh sugar water for bees: Stick with fresh white-sugar syrup. Avoid feeding honey from unknown colonies because it can carry pathogens such as American foulbrood spores.
Prevent pests: Clean up spilled syrup immediately and avoid leaving exposed syrup around the hive. If ants, wasps, or robbing bees become a problem, reduce exposed food sources and consider appropriate entrance or robbing protection.
Avoid unnecessary additives: Freshly prepared syrup and good feeder hygiene are more important than adding vinegar, lemon juice, or other ingredients to the feed.
If you’re new to beekeeping, our guide on how to start beekeeping walks you through the essential equipment, hive setup, and first steps before you begin managing your colonies.
No. Avoid feeding syrup while honey supers are on the hive. Bees may store the syrup in the supers, which can adulterate your harvest and make it unsuitable for sale as pure honey. Remove feeders before adding honey supers, and resume feeding only after the supers have been removed.
Use a physical barrier between the hive and the ground. Water or oil barriers around hive-stand legs can help, as can a sticky barrier such as Tanglefoot. Keep the barrier away from the hive and bees, and avoid placing ant poison near the colony. For top feeders, make sure the cover and feeder are properly sealed.
Refilling frequency depends on the feeder's capacity and the colony's consumption. Strong colonies can go through a gallon quickly during heavy feeding. Check the feeder regularly and refill it before it runs empty, especially when the colony depends on supplemental feed.
Watch for unusually aggressive bee activity around the entrance, fighting, bees attempting to enter through cracks, or dead bees accumulating on the landing board.
If robbing starts, remove exposed feed, reduce the entrance, clean up spills, and consider using a robbing screen. Entrance feeders deserve particular attention because their syrup is close to the hive entrance.
Beekeeper discussions commonly point to top feeders as a better choice during periods of robbing pressure because the syrup is less exposed outside the hive.
Entrance feeders are convenient, but their placement can make exposed syrup easier for other bees to find. Experiences vary by colony and conditions, so feeder choice should take local robbing pressure into account.
David Carter, founder of Farmstead Guide, has over 20 years of hands-on homesteading experience. From raising poultry to practicing sustainable farming, he shares practical tips and insights to help others live a more self-sufficient lifestyle.