How to Start Beekeeping
If you’re a honey lover or have a passion for the insects, beekeeping is the hobby to go with. Bees have a bit different behavior from other homesteading animals, since it’s an insect and have a totally different nature. For a novice, it might be frustrating to start beekeeping. The idea of opening a hive and seeing golden honey glistening inside is pretty special.
While starting beekeeping, think to yourself: Can I arrange the required tools? Do the bees sting me all the time? And some more questions like that. It’s important to learn the basics, understand the commitment, and prepare accordingly.
Why Start Beekeeping?
So, why do people keep bees in the first place? Well, the first and most obvious reason is honey. In a world full of artificial products, organic things have become rare. You can’t even trust foods like the honey sold in stores. There’s nothing quite like harvesting your own fresh, golden honey right from the hive in your backyard. It tastes different; richer, purer, and way more satisfying because you know exactly where it came from.

But beekeeping isn’t just about the sweet rewards. By keeping bees, you’re actually helping the environment. Honeybees are some of the world’s most important pollinators, and they play a huge role in our food supply and in keeping ecosystems healthy. Without them, a lot of the fruits, veggies, and flowers we enjoy wouldn’t exist in the same way.
Is Beekeeping Right for You?
Before jumping in, it’s worth asking yourself: “Is beekeeping really a good fit for me?” It’s an amazing hobby, but it does come with responsibilities.
Time Management
First, think about time. Beekeeping isn’t a full-time job, but it does take some regular attention. During the busy season, you’ll likely need to spend an hour or two each week checking on your hives, whereas in quieter months, it’s more about occasional maintenance.
Investment Oriented
Then there’s the money side. Setting up your first hive, including protective gear and bees, can be a significant investment, with ongoing costs for equipment and care each year. It’s smart to plan so the expenses don’t catch you off guard.
Space Considerations
You’ll also need space. A backyard is perfect, but people also keep bees on rooftops or small urban plots. The main thing is to ensure your hive gets some sun and is in a safe, legal location. Speaking of legal, you’ll want to check your local rules. Some areas require hive registration, limit how many hives you can have, or specify how far they need to be from neighbors.
Bees can also sting. These tiny creatures aren’t out to get you, but they will defend their hive if needed. If you’re allergic, it’s important to know how to treat stings and take safety measures.
Step 1. Learn Before You Begin
Before setting up your hive, take some time to do your research. Consider reading a book, joining a beekeeping course, and watching relevant podcasts or tutorials.
One of the best books I picked up was “Honeybee Democracy” by Professor Thomas Seeley, which I purchased back in 2011. It gave me a whole new perspective on how bees think, make decisions, and work together as a colony.
Along with that, Beekeeping for Dummies is a great starter book if you’re new to the hobby. This book will lay the foundation before you get hands-on with the bees.
Besides reading, I can’t stress enough how valuable local experience is. Joining a nearby beekeeping club or your state association is one of the smartest things you can do. You’ll learn tips that no book can teach, like how your region’s seasons, pests, and nectar flows work. If you can, take a beginner’s course or, even better, find an experienced beekeeper to mentor you for a year. Having someone show you the ropes in person makes a world of difference.
Step 2. Understand Bees’ Basic Biology
It’s essential to understand the basic biology of bees and colony structure. Having enough knowledge about the small society that lives within the colony will be pretty helpful.
Types of Bees
A bee colony isn’t a bunch of random bees flying around. It’s more like one big organization where every bee has a role to play. There are three main types of bees based on their roles.
Queen Bee
The queen bee is the mother of the hive, serving as the supreme leader of the bees’ colony. She can live for years, which is long compared to the others. She also produces special scents (pheromones) that keep the hive running smoothly and organized.
Worker Bees
Next come the worker bees. These are all females who are considered the laborers of the colony. Depending on their age, workers often switch jobs throughout their short careers, typically for a few weeks to a couple of months. Some clean the hive, others feed the young, build comb, guard the entrance, or head out to forage for nectar and pollen.
Drone Bees
Then there are the drone bees, the males. Their only purpose is to mate with a queen. That’s it. They don’t forage, they don’t guard, and they don’t help around the hive. Once they do mate, their life is over. You can know more about the bees lifespan in this guide.
Step 3. Essential Beekeeping Equipment Checklist
Before your bees arrive, you’ll need to gather some basic equipment. Don’t worry, it might look like a long list at first, but most of it is pretty simple. Once you’ve got your setup ready, you’ll use the same tools again and again.
A) Protective Gear
As protective equipment, you’ll need something to wear. When I was new to beekeeping, I used to wear a full beekeeping suit. However, with much experience, I now wear a jacket with a veil to protect my face.
Gloves are another essential item, and you can choose between leather or lighter synthetic options. The lighter ones give you a better grip.

Closed-toe shoes or boots are also important. Bees don’t like getting stepped on, and you don’t want a sting on your foot!
B) Hive Tools
Every beekeeper carries a few simple tools.
- 1 smoker: It is used to calm the bees when you open the hive.
- 1-3 hive tools: A hive tool (flat crowbar) helps you separate and lift frames.
- Some people also use a frame grip for easier handling and a soft bee brush to remove bees from frames gently.
Learn to remove the bees from your house, if they are nuisance and threat to public health.
C) Hive Components
Now let’s talk about the hive itself. The main parts include:
- 1 bottom board, this is the hive’s floor.
- 1 bee brush
- 2 brood boxes, which are deep boxes where the queen lays eggs and the colony raises young bees.
- Honey supers, which are smaller boxes placed above where the bees store extra honey.
- 4-18 shallow and deep frames with foundation (either wax or plastic) that fit inside each box, giving the bees a structure to build their comb.
- An inner cover and an outer telescoping cover that keep the hive insulated and protected from the weather.
- Wax embedding tool, fine gauge wire for wiring frames.
D) Feeding Equipment
When bees are starting out, they often need a little help. You can feed them sugar syrup (there are simple recipes for this) and sometimes pollen patties to boost their nutrition. Feeders come in different styles: ones that sit on top of the hive, at the entrance, or even inside the hive itself.
If all of this feels like a lot, don’t worry. Many companies sell beginner beekeeping kits that bundle the essentials together, which often saves money and makes setup a whole lot easier.
Costs of Equipment
Beekeeping isn’t free. The startup costs can reach around $800–$1,000 in the first year. Here’s what you might need:
- Bees: $200–$250 (package or nucleus colony)
- Hive setup: $200–$250 (Langstroth or other hive type)
- Protective gear: $150 (bee suit, gloves, veil)
- Tools: $100 (smoker, hive tool, brush, etc.)
- Feeders and supplements: $200+ (syrup feeders, pollen patties, sugar, supplements)
- Treatments: $50+ (e.g., Apiguard for mites)
- Other essentials: Alcohol wash supplies, spare hive box, queen replacement
Step 4. Choose Your Hive Type
| Hive Type | Pros | Cons |
| Langstroth | Standard parts, scalable for honey, easy to find equipment | Heavy to lift, inspections disturb bees |
| Top Bar | Lighter, natural comb building, easy to check frames | Lower honey yield, fragile comb, harder extraction |
| Warre | Minimal interference, good for cold climates, bee-friendly design | Less common, harder to inspect, smaller honey yield |
- If your goal is maximum honey, go Langstroth.
- If you want a lighter, natural approach, try Top Bar.
- If you prefer low-intervention, eco-friendly beekeeping, Warre may suit you.
How Many Hives to Start with?
When you’re starting out, begin with two hives instead of one. I know it sounds like extra work, but it makes a big difference. Having two hives gives you something to compare. If one hive seems weaker or isn’t producing much honey, you can look at the other one to check what’s normal and what’s not. Plus, if one colony doesn’t survive, which can happen, especially in the first year, you still have the other as a backup.
And just to be clear, when we say “two hives,” it doesn’t mean just two boxes. Each hive is composed of several stacked boxes, typically including one or two brood boxes at the bottom, where the queen lays eggs, and additional boxes, known as supers, on top for storing honey. So if you plan on keeping two hives, you’ll need two complete sets of boxes. As your colonies grow, you can add more boxes to give them space.
Step 5. Sourcing Your Bees
You can get bees in three different ways: packages, nucleus colonies (often called nucs), or catching a swarm. Each option has its own charm and challenges, so it’s worth understanding them before you decide.
i. Packages
Packages are the most common choice for beginners because they’re affordable, easy to order, and widely available. A package usually comes with a box of loose bees and a caged queen, which you’ll introduce to the hive yourself.
The downside is that these bees arrive with no built comb and no established colony structure. Since the queen is new to them, there’s always a bit of uncertainty about how quickly she’ll be accepted. It’s also a stressful start for the bees, so it takes a little extra care in the beginning.
ii. Nucleus
Nucleus colonies, or nucs, are like a starter pack hive. Since they already have frames, brood, food stores, and a queen, beginners should opt for this. The bees of such colonies settle in faster, and the colony grows very quickly, which makes things easier for a beginner.
The catch is that nucs cost more, aren’t always as easy to find, and moving them into your hive requires a bit of care. But overall, they give you a head start and increase your chances of success in that first season.
iii. Swarm catching
A swarm is a cluster of bees that has split off from another colony. These are the usually wild bees, and opting for them can be an adventurous route. It’s an exciting experience, and it feels like you’re helping nature in the process. But swarms are unpredictable; you can’t plan when or where you’ll find them, and their health history is unknown. It also requires quick action and proper protective gear to do it safely, so it’s not always the easiest way to begin.
If you want to attract wild bee colonies, set up a box or cavity that’s about 40 liters in size and place it around 2 meters off the ground. Make sure it has a small entrance at the bottom that faces the morning sun. Rubbing a bit of lemon balm on the box can help catch the attention of scout bees. Spring is the best time to try this since that’s when swarms are most active.
What We Recommend
No matter which path you choose, you’ll need to decide where to source your bees. In our village, we serve as local beekeepers, and that’s what I recommend for you as a beginner. I suggest this because of its adaptability to your climate.
Packages can also be ordered online if local choices are limited. One of the best steps you can take is to join your local beekeeping association. Not only will you meet mentors and fellow beginners, but you’ll also gain access to trusted sources for bees and plenty of practical advice.
Step 5. Setting Up Your Hive
1. Site Selection
Picking the right spot for your hives is one of the most important steps in beekeeping. Bees require a balanced combination of comfort, safety, and convenience to thrive. I have witnessed wild bees build hives within the barriers of trees, hedges, or bushes in the mountains and on farms. They avoid windy spaces or areas with exposed surfaces. Wild bees also prefer a place where they can easily find water, nectar from flowers, and other essential things.

From their natural habitats, you have a good overview of the place to choose for them. A sunny place works best, especially with some gentle morning sunlight to get the bees buzzing early in the day. If you live somewhere hot, a bit of afternoon shade is a lifesaver, so the hive doesn’t overheat.
Water Source
Bees also require a steady water source nearby. If there isn’t a natural one around, you can set out a shallow container with floating corks or pebbles so they can land safely. Make sure the ground around your hive drains well, as bees don’t appreciate soggy feet or standing water.
Think About Neighbors
Another thing to think about is people. You want to be able to reach your hives easily for inspections, but you don’t want your bees flying right through your neighbor’s yard or across your front porch. Also, check your local rules, as some areas have ordinances regarding the number and location of hives you can keep.
Security Concern
And then there’s security. Bees have natural enemies, such as skunks, ants, and, in some regions, even bears. Besides that, hive theft is a real issue in some areas, so consider placement to deter both animal and human intruders.
Step 6. Build Frames & Wiring—Practical Steps
- Assemble the frames and then quickly flame them with a blowtorch to burn off splinters and lightly sterilize them.
- String the horizontal wire: wind the wire tightly around small tacks driven into the frame edge, and remove any wire burs.
- Cut a small plywood spacer (example: 12″ piece) to support the foundation when embedding.
- Insert foundation wax: orient the side with the most wax so that the existing vertical wires don’t block the embedding of your horizontal wires. Put the foundation into the top groove and ease into the bottom groove.
- Embed horizontal wires with a wax embedder: heat the embedder (a cup of boiling water to keep it hot), then roll it along the wire so the wax melts and the wire sinks into the foundation. If vertical wires interfere, you likely put the foundation upside down; flip it right side up.
- Repeat this process for the remaining frames (expect to inspect 20–30 frames for a hive).
Step 7. Installing Your Bees into the Hive
A) Getting Ready for the Big Day
Once you get your bees and new hive, the exciting part comes of moving them in. But before you open the box, make sure our hive is all set up in its spot, with every part in place. Have some sugar syrup ready to give the bees a boost during their first days. And, most importantly, don’t forget your protective equipment.
B) Installing a Package of Bees
If you’re starting with a package of bees, the process is pretty straightforward. You’d have to take the following steps.
- Start by lightly misting the bees with sugar syrup to calm them down and keep them busy cleaning themselves.
- Carefully remove the queen cage from the package and check that the queen looks healthy.
- Place the queen cage inside the hive, securing it gently between the frames.
- Shake the remaining bees from the package into the hive so they can join the queen.
- Once the bees are inside, close the hive, provide sugar syrup for feeding, and let them settle in to start building their new home.
C) Installing a Nuc (Nucleus Colony)
Installing a nuc is even simpler. Since a nuc already comes with frames of comb, brood, and food, all you need to do is carefully transfer those frames into your hive box. Here you’ve to keep them in the same order. Double-check that the queen is present and active, then close the hive and provide the bees with their syrup. From there, it’s just about watching and making sure they settle in.
This first step might feel intimidating, but it’s truly one of the most rewarding moments in beekeeping. Seeing your bees march into their new home and get to work is a little magical. And it’s the beginning of your journey as a beekeeper.
Step 7. Basic Hive Management: What to Do in the First Year
Feeding Your Bees in the Beginning
Your first year with bees is all about helping them settle in, grow strong, and stay healthy. In the very beginning, most of the new colonies need a little extra help with food, so feeding them sugar syrup is common. Think of it as a temporary boost while they get busy building comb and finding natural nectar sources.
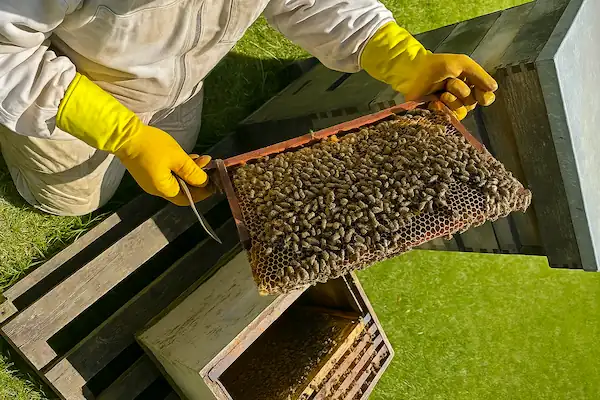
Your First Inspection
A few days after you install your bees, usually between day three and day seven, it’s time for your first inspection. This is just a gentle check to make sure the queen has been released, she’s started laying eggs, and the bees are beginning to build comb. You’ll also want to watch their overall activity to see how they’re adjusting to their new home.
Regular Check-Ins
After that, you’ll have to do regular inspections throughout the season. Not daily or every second day, as that would stress the bees. Instead, once every week or two is perfect.
Look for signs that the queen is alive and active. Check for a healthy brood pattern, and make sure the colony has enough food stored. You’ll also be keeping an eye out for early signs of pests or diseases.
Managing Hive Space
As your colony grows, space management becomes important. Bees don’t do well in cramped spaces, so you’ll need to add extra boxes at the right time. This gives them room to store honey and expand their brood.
If you fail to arrange the extra boxes at the proper time, overcrowding can trigger swarming, where part of the colony leaves to form a new hive.
Be Patient and Observe
Remember that beekeeping is a slow and steady process. Don’t rush it. Spend time simply watching your bees. They’ll teach you a lot about what they need. The first year is less about big honey harvests and more about building a strong and healthy colony. Once you do that, it will thrive for years to come.


