Dreaming of a brooder full of tiny, fluffy quail chicks but feeling nervous about incubation? All the talk about exact temperature, humidity, and timing can make it seem complicated. No one wants to waste eggs on a failed hatch.
The good news is that it’s much simpler than it sounds. With the right basics and a clear approach, hatching quail eggs can be manageable and incredibly rewarding. I have gone through the trial and error phase myself. I have adjusted temperatures late at night and dealt with disappointing hatches.
Over time, I refined my process and improved my hatch rates. Once I focused on keeping conditions stable and stopped overcomplicating things, everything became easier and far more enjoyable.
Understanding Quail Egg Biology & Incubation Basics
Before you pop those eggs into the incubator, it helps to know what’s actually going on inside. A quail egg might look small and simple, but it’s a tiny life-support system packed with everything a chick needs to grow.
The Miracle Inside the Egg
- Shell: The hard outer layer protects the chick. It’s not completely solid though, tiny pores allow oxygen in and carbon dioxide out.
- Membranes: Just inside the shell are two thin layers that act like extra protection, helping keep bacteria out.
- Albumen (egg white): This is mostly protein and water. It cushions the embryo and gives it moisture.
- Yolk: The yolk is the chick’s main food supply. Everything it needs to grow is stored here.
- Germinal disc: This tiny spot on the yolk is where life begins. If the egg is fertile, this is where the embryo starts forming.
- Air sac: This pocket of air forms at the wide end of the egg. Right before hatching, the chick takes its very first breath from this space.
Why Incubation Matters
In the wild or in your backyard coop, a mother quail does all the work. She keeps the eggs warm with her body and turns them regularly with her beak. That warmth and movement are what allow the chick to grow properly.
When we incubate eggs artificially, our job is to copy what the hen would naturally do, just in a controlled environment. The incubator becomes the “mother,” providing steady warmth, the right humidity, and regular turning.
The Pillars of a Successful Hatch
Getting a good hatch isn’t about luck. It comes down to four esstial things.
1. Temperature
Temperature is everything. The embryo grows because of steady, consistent warmth. Even small temperature changes can cause problems.
If it’s too hot, the embryo can develop deformities or die early. Too cold, and development slows down or stops completely. That’s why keeping the temperature stable, not just ‘close enough’ is so important.
2. Humidity
Humidity controls how much moisture the egg loses during incubation. This affects the size of the air sac inside the egg.
If humidity is too low, the egg loses too much moisture and the chick can get “shrink-wrapped” in the membrane, making it hard (or impossible) to hatch.
If humidity is too high, the air sac may stay too small, and the chick might struggle to breathe before hatching.
So humidity isn’t just about comfort. It directly affects whether the chick can hatch safely.
3. Turning
Egg turning isn’t just a random step. It’s biologically necessary. In nature, the mother turns her eggs many times a day. This keeps the embryo from sticking to the inner membrane and helps nutrients from the yolk spread evenly.
Turning also ensures the embryo develops properly and gets even warmth on all sides. Skip turning, especially in the early days, and the embryo can stick and die.
4. Ventilation
Growing chicks need oxygen, and they produce carbon dioxide as they develop. Good airflow in the incubator keeps oxygen coming in and waste gases moving out. Without proper ventilation, even perfectly warmed eggs won’t develop well.
When you understand these basics, incubation stops feeling like a mystery. It’s simply about recreating the natural conditions a mother quail would provide warmth, moisture, movement, and fresh air. Get those right, and you’re well on your way to a successful hatch.
Essential Equipment for Quail Egg Incubation & Hatching
Before you start, having the right setup makes everything much easier.
A) Choosing the Right Incubator
Your incubator is the most important piece of equipment. There are a few types:
- Still air incubators: Basic and usually cheaper, but temperature can vary inside.
- Forced air incubators: Have a fan to circulate heat evenly, which gives more consistent results.
You’ll also choose between:
- Manual turning: You turn the eggs yourself.
- Automatic turning: The machine does it for you, much easier and more consistent.
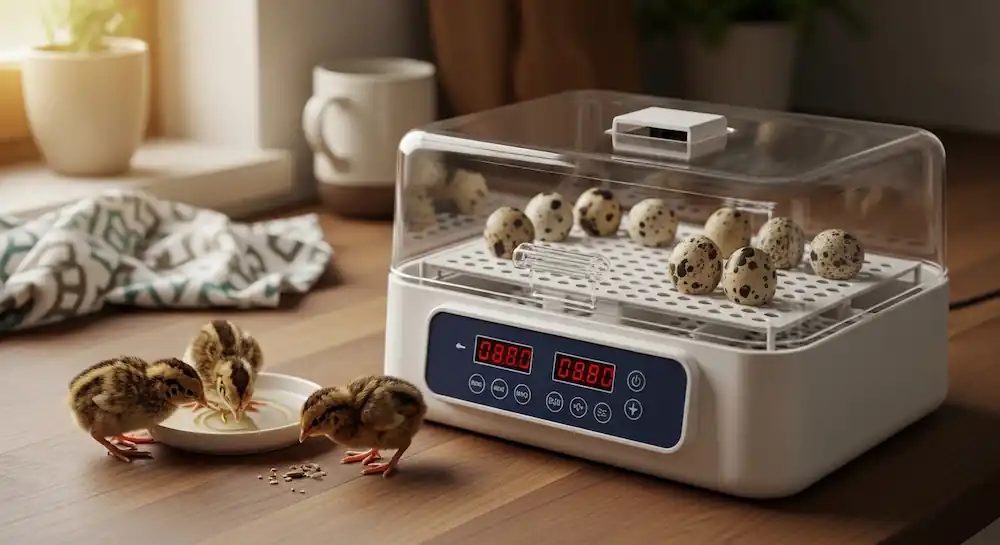
If you want less stress and better hatch rates, an automatic incubator with humidity control is a smart choice. Look for digital controls, a clear viewing window, easy cleaning, and reliable humidity settings.
We’ve personally tested this automatic quail incubator and found it reliable for small batches. The temperature stays stable, the automatic turning works consistently, and it’s easy to monitor through the clear lid. It’s a solid choice for beginners who want a simple, low-stress setup for better hatch rates.
B) Thermometer & Hygrometer
Quail eggs are sensitive, so accurate temperature and humidity readings are critical. Digital thermometers and hygrometers are usually more precise and easier to read than analog ones.
Go with a calibrated digital thermometer/hygrometer (check on Amazon), and always test it before starting. You can use a salt test to check humidity accuracy and an ice bath test to check temperature.
C) Egg Candler
A candler lets you shine light through the egg to check if it’s developing. It helps you remove infertile eggs early. An LED egg candler (check on Amazon) works great and is safe for the eggs.
D) Brooder Setup
Your chicks need a warm home right after hatching, so set this up before hatch day. You’ll need:
- Brooder box: A plastic tote or large bin works fine. You can buy this one on Amazon. It’s the model we personally tested.
- Heat source: Either a heat lamp or a brooder plate.
- Small chick feeder and waterer: Sized for tiny quail chicks.
- Bedding: Pine shavings work well. For the first few days, paper towels help prevent slipping.
Other Handy Items
- Spray bottle to adjust humidity if needed
- Non-slip liner or paper towels for the brooder floor
With the right tools in place, the whole process becomes smoother and far less stressful.
Sourcing & Storing Fertile Quail Eggs
Your hatch success starts long before the incubator. It always begins with choosing the right eggs, because I’ve seen firsthand how much that decision affects the final hatch rate.

Finding Good Quality Fertile Eggs
Healthy parent birds mean stronger, more fertile eggs. Good genetics and proper care directly affect your hatch rate. That’s why it’s important to buy from reputable breeders with healthy flocks and a solid track record.
Look for breeders with positive reviews, local recommendations, and clear information about their birds’ health and fertility rates. Avoid random sellers with big claims but no proof. Cheap eggs from unknown sources often lead to poor hatch results.
It’s also worth supporting breeders who truly care about animal welfare and maintain clean, well-managed flocks. Healthy birds produce better eggs, simple as that.
I always buy from breeders known for strong fertility rates and well-cared-for birds. It greatly increases your chances of a successful hatch.
What to Look for in Fertile Eggs?
Not all eggs are worth incubating. I always check for:
- Clean shells: A little natural dirt is fine, but don’t wash eggs (washing removes the protective coating called the bloom).
- No cracks: Even tiny cracks can ruin a hatch.
- Normal shape: Avoid oddly shaped or misshapen eggs.
- Consistent size: Very small or oversized eggs may not hatch well.
- Freshness: The fresher the egg, the better the hatch rate.
Handling Shipped Eggs
If your eggs arrive by mail, handle them gently when unpacking. Let shipped eggs rest pointed end down at room temperature for 12–24 hours before putting them in the incubator. This allows the air sac inside to settle properly after shipping.
Storing Eggs Before Incubation
If you’re not incubating right away, store them properly:
- Keep them in a cool place, cooler than incubation temperature.
- Store with the pointed end down.
- If storing longer than a week, gently tilt or turn them once daily.
- Try to incubate within 7–10 days for the best hatch results.
If you’re planning to hatch your own chicks, it’s important to understand male vs female quail so you can maintain proper breeding ratios.
Setting Up Your Incubator for Quail Eggs
Getting your incubator ready the right way can make a big difference in your hatch rate.
1. Clean Everything First
Before you even plug it in, give your incubator a deep clean. Remove dust, old shell pieces, and any leftover mess from previous hatches. After cleaning, disinfect it using an avian-safe disinfectant like Virkon S or a properly diluted bleach solution.
Always clean and disinfect your incubator and brooder before and after every hatch.
Good sanitation isn’t just about neatness; it prevents harmful bacteria from growing. Bacterial contamination can cause early embryo death or even “exploding eggs,” which can ruin an entire batch and spread infection to healthy eggs.
2. Assemble & Calibrate
Set up the incubator exactly according to the manufacturer’s instructions. Even if your thermometer or hygrometer says it’s pre-calibrated, test it yourself.
Calibrate your thermometer using the ice bath method and your hygrometer using the salt test before starting. Accurate readings are critical for quail eggs.
3. Pre-Warm & Stabilize
Add water to the incubator channels as instructed. Then let the incubator run empty for at least 24–48 hours before placing any eggs inside.
This waiting period allows temperature and humidity to fully stabilize so there are no sudden swings once the eggs are added. Keep an eye on the readings and make sure everything stays steady within your target range.
4. Placing the Eggs
Wash your hands before handling eggs. Quail eggs are delicate, so handle them gently and as little as possible to avoid contamination or damage.
- For automatic turners, place eggs on their sides.
- For manual setups, usually place them pointed end down in trays.
- If turning by hand, lightly mark each side of the egg (like “X” and “O”) so you know they’re being rotated properly.
Before setting up your incubator and brooder, make sure you have proper housing ready, especially if you’re planning long term breeding. A well-designed quail cage setup will make managing your growing flock much easier and more efficient.
The Quail Egg Incubation Schedule & Daily Care
When I incubate quail eggs, I always remind myself that it’s a short but very precise process. For Coturnix quail, the full journey usually takes 17–18 days from start to hatch.
- Days 1–14: Early development stage
- Days 15–17/18: Lockdown (final hatch phase, no more turning)
If you’re working with other breeds, timing can be slightly different:
- Bobwhite quail: Around 23 days
- Button quail: Around 16 days
Days 1–14: The Critical Growth Stage
This is when most of the embryo’s development happens, so I pay very close attention during these days.
Temperature
I keep my incubator between 99.5–100.5°F (37.5–38.1°C).
Consistency matters more than anything. Even small swings can affect development. I personally check my thermometer multiple times a day, especially during the first week, just to be sure everything is stable.
A lot of beginners worry about the “perfect” number. My advice? Stay within the correct range and avoid sudden changes. Stable is better than constantly adjusting.
Humidity
For the first 14 days, I aim for 45–55% humidity.
Humidity controls how much moisture the egg loses. If it’s too low, the egg can dry out too much, making it harder for the chick to hatch. Too high, and the air sac may not develop properly, which can cause problems at hatch time.
I adjust humidity by adding water to the incubator channels. If needed, I carefully use a spray bottle but I avoid overdoing it.
Turning the Eggs
I turn eggs at least 3–5 times a day, and I prefer an odd number (like 3 or 5). If I’m using an automatic turner, it makes life much easier. If turning by hand, I’m very consistent with timing.
Turning is not optional. It prevents the embryo from sticking to the shell membrane and helps all parts develop evenly. Without regular turning, the embryo can attach to one side and stop developing properly.
Days 15–17/18: Lockdown
On Day 15, I stop turning the eggs completely. This is called lockdown. The chicks are positioning themselves to hatch, and movement can interfere.
At this stage, I slightly increase humidity (commonly around 65–70%) to help soften the shell membranes and make hatching easier. After that, it’s mostly a waiting game.
Estimating Hatch Day
If you set your eggs today, just count forward 17–18 days for Coturnix. I usually mark my calendar the day I place them in the incubator so I know exactly when lockdown starts and when hatch day should be.
Candling Quail Eggs: Monitoring Development & Identifying Infertility
Candling is simply shining a bright light through the egg to see what’s happening inside. I use it to check if an egg is fertile, see how development is going, and remove eggs that aren’t viable. It’s basically your only “window” into the egg before hatch day.
When I Candle & What I Look For
First Candling (Day 5–7)
This is the most important check. In a fertile egg, I look for:
- A small dark spot (the embryo)
- Spider-like blood vessels spreading out
If the egg is infertile, it usually looks clear. You might see a faint yolk shadow, but no veins.
If development started and then stopped, you’ll often see a blood ring, a red circle inside the egg. That means the embryo died early.
Many beginners struggle here because quail eggs are small and speckled. My advice? Candle in a very dark room and use a strong LED candler. It makes a big difference.
Second Candling (Day 14 – Before Lockdown)
By this point, a healthy egg looks mostly dark because the chick fills up most of the space. You should clearly see the air sac at the blunt end. Sometimes you can even spot movement.
If the egg still looks mostly clear or hasn’t developed much, it’s not going to hatch. Hatching is just the beginning. Learn the full process of raising quail for eggs and meat production after your chicks grow out.
The “Lockdown” Phase: Getting Ready to Hatch
For Coturnix quail, lockdown usually starts on Day 15, about three days before hatch day.
This is when things get serious. The chicks are positioning themselves to hatch, and small mistakes during this stage can cause problems.
A lot of people get confused about when to start lockdown and what to change. It’s actually simple — just a few key adjustments.
What I Change During Lockdown
I completely stop turning the eggs on Day 15. This allows the chick to position itself properly inside the egg; head tucked toward the large end and beak near the air sac. This position is necessary for internal pipping (the chick’s first breath inside the shell).
If you keep turning during this stage, you can mess up that positioning.
2. Increase Humidity
I raise humidity to about 65–75% during lockdown. Higher humidity softens the inner membranes so the chick can pip (crack the shell) and zip (cut around the shell) more easily. If humidity is too low, the chick can get “shrink-wrapped,” meaning the membrane dries out and sticks to its body.
Humidity during lockdown is more critical than earlier in incubation. Keep it high and stable to prevent chicks from sticking to their shells.
To increase humidity, I add more water to the channels. Some people use a damp sponge or a humidity pump if their incubator supports it.
Keep Everything Stable
During lockdown, I resist the urge to open the incubator. Every time you open it, humidity drops fast and that can cause membranes to dry out. Keep:
- Temperature steady (same as before)
- Humidity high and stable
- Ventilation open for fresh air
After that, it’s mostly about patience and letting nature do its thing. Once your chicks hatch, proper nutrition becomes critical. Our guide on quail feeding explains what to feed them at every stage.
The Hatching Process: Pipping, Zipping & Emergence
Hatch day is exciting and nerve-wracking. This is when all your patience finally pays off.
Internal Pipping
Internal pipping is when the chick breaks through the inner membrane into the air sac. This is its first access to air inside the egg.
Sometimes I can hear faint peeping at this stage. It usually happens 12–24 hours before you see any crack on the outside. Even though nothing looks different yet, big progress is happening inside.
External Pipping
This is when the chick makes a tiny hole in the outer shell. You’ll usually see a small crack or pinpoint hole near the blunt end of the egg.
This is where many beginners get anxious because progress can seem slow. But a small hole doesn’t mean the chick is stuck; it’s just resting and absorbing the remaining yolk.
Zipping & Emergence
After resting, the chick starts zipping. That means it slowly rotates inside the egg, cracking the shell in a circle. This part can take several hours. Patience is key.
Eventually, the chick pushes free from the shell. When it first comes out, it looks wet, messy, and completely exhausted. That’s normal. I always remind myself not to judge too quickly; once dry, they fluff up beautifully.


