Automatic Waterer for Chickens
If you keep more than five chickens, an automatic chicken waterer usually saves time, keeps water cleaner, and reduces daily maintenance. Nipple systems stay the cleanest, cup systems are easiest for beginners, and float-valve systems work best for larger flocks. DIY systems cost less upfront, while commercial systems often last longer and require less troubleshooting.
Keeping your chickens watered shouldn’t feel like a never-ending job. Anyone who has dealt with dirty bowls, frozen water in the cold months, or constant worries about germs knows how tiring it can get. Keeping the water clean every single day takes much more effort than most people realize. It quickly becomes one of the biggest headaches for chicken owners.
The old-style open waterers don’t help much either. They get filthy in no time, collect bacteria, invite bugs, and fill up with dust and feathers. Not only does this give you more cleaning to do, but it can also lead to dehydration or health issues in your flock. It’s easy to imagine how much simpler life would be if the water stayed clean, the chores took less time, and your chickens stayed healthy without you having to check on things constantly.
That’s why many chicken keepers turn to automatic waterers. These setups take most of the work out of the daily routine and make life in the coop run more smoothly.
Benefits of Automatic Chicken Waterers
- Allows chickens to access water even when you’re away for a day or two.
- Keeps dirt, bedding, droppings, and debris out of the water supply.
- Reduces bacterial growth and lowers the risk of waterborne diseases.
- Cuts down on refilling, cleaning, and monitoring water levels.
- Minimizes spills and evaporation compared to open waterers.
- Makes the coop less attractive to rodents, insects, and wild birds.
- Provides a steady supply of fresh water throughout the day.
- Helps keep bedding drier and reduces muddy areas around drinkers.
Types of Automatic Chicken Waterers
There are several kinds of automatic chicken waterers, and each one works a little differently. Understanding how these systems deliver water helps you choose the right fit for your flock, your climate, and your daily routine.
By knowing how each mechanism functions, you’ll also see why some designs stay cleaner, prevent bacteria, and keep your chickens healthier. Clean water is a vital part of flock health, so choosing the right setup really does make a difference.
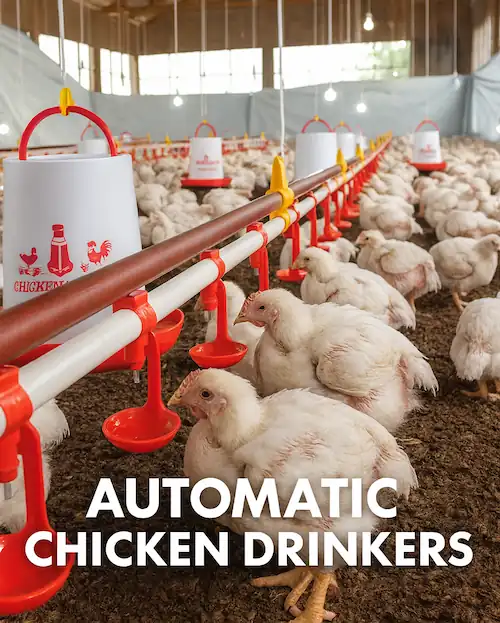
1. Nipple Waterers
Nipple waterers are one of the cleanest and most reliable watering systems you can use. They work by releasing a small amount of water each time a chicken pecks a metal pin or lever. Because the water stays sealed inside the container until the moment the bird drinks, it stays cleaner for much longer and doesn’t spill into the bedding.
This type of waterer has been my personal go-to because it reduces daily chores and keeps the coop noticeably drier. Once the chickens learn how to use it, the whole setup becomes incredibly low-maintenance. It works well for flocks of almost any size, and the overall hygiene improvement is hard to beat.
The only challenges are the small learning curve for some birds, the chance of freezing in winter, and the possibility of clogs if the water supply isn’t filtered. But even with these drawbacks, nipple waterers still offer some of the most hygienic and efficient watering you can get.
Buy Our Tested Automatic Chicken Waterers
All the automatic waterers listed below are thoroughly tested and highly reliable. Most users love them, and they include both heated models and freeze-free systems to keep water fresh in any weather.
Providing clean water with reliable chicken waterers plays a big role in the overall lifespan of chickens, keeping them healthy and hydrated for years.
i. RentACoop Chicken Nipple Waterer for DIY Setups
I’ve tried a bunch of watering systems over the years, and honestly, this RentACoop upgraded nipple-and-cup (check on Amazon) style has been one of the easiest and cleanest options I’ve used. I had the older version without the cups for about six years, and it still worked fine, just faded in color.
The cups looked like they might collect dirt, but after a couple of weeks, they still looked clean. Installing the nipples was surprisingly simple too. Even with basic drilling skills, it took just a few minutes to set everything up, and it didn’t leak at all on the first try. I attached them to an old container, kept the lid slightly loose for airflow, and the water flows perfectly.
My chickens learned to use them fast. I showed one calm hen first; she figured it out immediately, and the rest followed her. I love that their water stays clean now, no more bedding or dirt getting sucked back into the bucket. I’ve used these on buckets and PVC pipes and haven’t had any leaks or clogs. Even my ducks use them without a problem.
They feel sturdy too, so I’m planning to try them in winter with a heated setup. Overall, these nipples work way better than the watering cups I used before and keep the water fresh for days. Super easy, super clean, and totally worth it.
iI. Eggluuz 5 Gallon Automatic Nipples Drinker
The Eggluuz Chicken Waterer Nipple Side Mount (check on Amazon) is easy to install on a 5-gallon bucket using a 9mm drill bit and provides a reliable, leak-free watering solution. Water is released only when chickens peck the pin, helping keep the coop clean and dry. Even younger hens learn to use it quickly, while the durable construction holds up well over time. It also works great for quail and requires very little maintenance. With proper installation, it can operate for months without leaks, making cleaning and refilling much easier than traditional waterers.
Its pack is great for sharing or setting up multiple buckets. The hens learn fast, and the included drill bit makes installation simple. Compatible with big or small buckets.
This nipple drinker is much easier than traditional waterers, with slow refills needed even if there’s a tiny leak. Chickens enjoy fresh, clean water, and it’s highly functional. It also works well as a replacement for other waterer nipples and crews in easily with no adjustments, making it ideal for DIY setups.
III. OverEZ 12 Gallon Chicken Waterer
The OverEZ waterer (check on Amazon) holds up to 12 gallons, and its drip-free nipple design lets up to three chickens drink at once. In this waterer, water stays clean and fresh for days, so they do not have to refill often. It reduces daily chores and works indoors or outdoors.
However, its lid is not always secure and can be knocked off by chickens, letting debris or water in. Others have found the nipples leak or break over time.
Overall, the OverEZ offers a high-capacity, low-maintenance, mostly clean-water solution for small to medium flocks, but it may require occasional checks to ensure lids stay shut and nipples remain leak-free.
2. Cup Waterers
Cup waterers have small cups that refill automatically whenever the water level drops. These are easy for chickens of all ages to use, including older chicks who aren’t quite ready for nipples but still need something cleaner than an open bowl.
They provide a steady flow of water and are less likely to freeze than nipple systems. However, the cups can collect a little dirt or bedding from curious birds. Some minor spillage can happen, but it’s still far cleaner than with traditional pans.

Popular choices include systems from Darcvds and Premier 1 Supplies. The Darcvds cup waterer kit (check on Amazon) makes putting together a poultry watering system pretty simple. The cups mount easily to a bucket or container, start filling automatically, and keep water available without leaks when installed properly. It helps reduce dirt, droppings, and bedding from getting into the water like with open troughs.
However, for larger flocks, one 8-cup pack may not be enough, and regular cleaning is required to prevent muck or algae build-up in the cups.
3. Bell Waterers
Bell waterers are the classic, large, bell-shaped waterers that many people have seen in bigger poultry setups. They work with a gravity-fed reservoir that keeps a trough full of water as needed.

These are perfect for larger flocks because they hold a lot, last a long time, and are very sturdy. Chickens accept them quickly since the drinking area feels familiar. The downside is that the open trough can still collect dirt and feathers, and the whole unit can feel bulky in smaller coops.
4. Gravity-Fed DIY Systems
For people who love simple DIY solutions, gravity-fed systems are a fun, low-cost option. They’re made from something like a 5-gallon bucket or PVC pipe that sends water down to nipples or cups.
They’re very affordable, easy to build, and you can design them to fit your exact coop layout. Just keep in mind that you’ll need to refill the main reservoir regularly. These setups can also leak a bit if not sealed well, and they may not look as polished as store-bought options. Still, they work exceptionally well when built carefully.
These two gravity-fed chicken waterers are among the most reliable and popular choices for backyard poultry keepers.
I. Harris Farms 6.2 Gallon Poultry Drinker
After trying nearly every style of chicken waterer over the years, this one (check on Amazon) stands out as the most reliable and practical option I have used. It keeps the water clean, the tray is large and easy to rinse, and the float system prevents dirty water from being sucked back into the reservoir like traditional vacuum waterers do. It fills from the top, which saves a lot of time and frustration, especially in winter. It also works well with a heater base and stays functional even in freezing temperatures.
The only real learning curve is making sure the float sits correctly and the base is tightened properly. Once assembled the right way, it runs smoothly and rarely needs to be taken apart. It cannot be hung by the handle, and the water level in the tray stays shallow, but it is more than enough for chickens.
Overall, this is one of the best year round waterers for backyard flocks. It stays clean, holds plenty of water, is easy to maintain and is far better than the typical vacuum-style plastic or galvanized founts. A reliable choice for anyone tired of leaks, mess, and constant scrubbing.
II. FARM-TUFF 5 Gallon Galvanized Poultry Waterer, Freeze-Free
For anyone tired of plastic waterers cracking or failing in cold weather, this Farm-Tuff metal waterer (check on Amazon) is a much better option. It holds up well through winter, especially when placed on a heater pad, and does not freeze as many plastic models do. The construction is sturdy, and the lid comes off easily for filling. Its smooth interior makes cleaning simple.
The inner carrying handle adds convenience, and overall the unit feels solid and dependable. The only thing to keep in mind is that it may leak if moved with the lid on, but filling the inner container first and then replacing the lid solves the issue.
If plastic waterers have been a problem, this durable metal version is a reliable upgrade that performs consistently in all seasons.
5. Pressurized Systems
Pressurized systems are the ultimate convenience option. They hook directly into a water line or garden hose and refill automatically using a float valve. This means you never have to worry about running out of water.
They’re best for permanent coops or larger operations where dependability is key. These systems are incredibly reliable, but installation is more complex and the upfront cost is higher. They also require proper plumbing connections to avoid leaks.
Automatic Chicken Waterer Type Comparison
| Waterer Type | Cleanliness | Winter Use | DIY Friendly | Best For |
|---|---|---|---|---|
| Nipple | Excellent | Fair | Excellent | Most flocks |
| Cup | Good | Good | Excellent | Beginners |
| Bell | Fair | Fair | Poor | Large flocks |
| Float Valve | Excellent | Good | Moderate | Permanent setups |
What to Look for When Buying an Automatic Chicken Waterer
- Pick a system that provides enough drinking points for all birds.
- Choose a capacity that matches your flock size and daily water needs.
- Look for food-grade, BPA-free plastic or stainless steel construction.
- Select a design that is easy to disassemble and clean.
- Prioritize durability over the lowest purchase price.
- Check for leak-resistant fittings and reliable water flow.
- Consider heated or freeze-resistant models in cold climates.
- Ensure the installation method suits your coop setup.
While water is essential, knowing what to feed chickens complements your water system to maintain a healthy and productive flock.
Installation and Placement Tips
- I keep waterers inside the coop or a covered run to keep the water cleaner and cooler.
- A stable setup prevents spills, leaks, and unnecessary mess around the coop.
- Heated systems need a safe electrical connection before winter arrives.
- Raising the waterer helps keep bedding, dirt, and droppings out of the water.
- When switching systems, I leave the old water source available until the flock adapts.
- A quick check during the first few days helps identify any birds struggling to drink.
- Filtered rainwater can work well in larger setups and reduces water costs.
DIY Automatic Waterers: A Step-by-Step Guide
If you like saving money and enjoy building things yourself, a DIY homemade chicken waterer is a great option. I’ve made several over the years, and the biggest benefit is their customization. You can size them to fit your coop, adjust how many drinking points you need and build everything exactly the way you want. You’d do all this without spending much.
Before you start, it’s smart to plan a small budget and gather your materials. Many of the parts are easy to find at hardware stores, farm supply shops, or even online. I always recommend using food-grade components for anything that will come into contact with water. Buckets, PVC pipes, sealants; these all matter, because you don’t want chemicals leaching into your flock’s drinking water.
I only use food-grade buckets, PVC, and sealants in my builds. It keeps the water safe and prevents any weird tastes or health issues down the road.
You don’t need to be highly skilled to build a waterer like this. Basic drilling, measuring, and sealing are usually all it takes. A drill and an appropriately sized drill bit for installing the nipples are the most essential tools. Safety matters too, so I always use proper PPE when drilling plastic and handling sealants.
DIY Bucket Nipple Waterer
One of the simplest designs is an elevated 5-gallon bucket fitted with horizontal or vertical nipples. I’ve built this version many times, and it works great for small and medium flocks.
To build your own, you’ll need:
- A food-grade 5-gallon bucket with a tight lid
- Poultry nipples (horizontal or vertical)
- A drill and the correct drill bit
- Food-grade silicone sealant
- Rope, chain, or brackets to hang the bucket
I built mine using the following basic steps.
- Prep the bucket: Give it a good clean and check that the lid snaps on firmly.
- Drill holes: Measure and mark the spots evenly before drilling. Accuracy prevents leaks later.
- Install the nipples: I screw them in carefully and seal around each one with silicone.
- Add the hanging setup: I usually hang mine with a chain because it’s sturdier.
- Test everything: I always test for leaks before hanging it in the coop. A quick fill test saves a lot of frustration later.
Make sure all holes are clean, the sealant has fully cured, and the system is completely watertight before giving it to your chickens.
PVC Nipple or Cup Line Systems
If you want something more permanent or you have a larger flock, you can create a line of PVC pipes with multiple nipples or cups. These systems look clean, run along a wall nicely, and make it easy for several chickens to drink at once.
PVC gives you a lot of flexibility too. You can add connectors, elbows, or tees to reach any corner of your coop. Just make sure the PVC is food-grade (NSF-rated) and always check your seals before filling.
Eco-Friendly Watering Options
For keepers who want a more sustainable setup, you can build an off-grid waterer using rainwater collection and solar power. I’ve tried this on one of my coops, and it’s a great way to reduce reliance on municipal water or electricity.
If you collect rainwater, always run it through a proper filter or purifier before giving it to your flock.
I test the pH of my rainwater from time to time. Extreme pH levels or heavy minerals can affect both chicken health and the lifespan of your waterer.
Another trick I’ve learned is using opaque or dark-colored containers for reservoirs. It blocks sunlight and helps keep algae from forming. Opaque containers make a huge difference in reducing algae growth, especially in hot climates.
Maintenance Tips to Make Your Waterers Last Longer
Keeping an automatic waterer in good shape is not that difficult, but it does require regular care. Clean water is essential for a healthy flock, and even minor issues like clogs or leaks can cause stress for your chickens. A little routine maintenance helps prevent problems before they start and keeps the system working smoothly for a long time.
Daily, Weekly, and Monthly Care
I like to start with a quick daily check. Make sure the water is flowing properly and the drinking points are not clogged. Check the height of the waterer and adjust it if the bedding has shifted. Small habits like these keep everything running well.
A weekly rinse helps even more. I usually take the waterer apart, give it a quick scrub with a brush, and rinse it out. A simple vinegar mix works great. One part white vinegar with four parts water helps remove mineral deposits and slows down bacterial growth.
Once a month, I do a deeper clean. I disinfect the system with a chicken-safe sanitizer, check the seals, and replace any worn parts. This routine makes a big difference in preventing biofilm and harmful bacteria, which can grow in any water system if left unchecked.
Common Problems and How to Fix Them
Automatic waterers are reliable, but they can still run into issues. Most problems are simple to solve when you know what to look for.
Clogs
Clogs usually happen because of debris, dirt or mineral buildup. Filtering your water and cleaning nipples or cups regularly can prevent this. If a clog shows up, flush the line and tap the nipple gently until water flows again.
Leaks
Leaks can come from loose fittings, cracked parts, or worn seals. Tighten the connections and check for damage. If a seal looks old, replace it and apply fresh and food-safe sealant. A small leak can create a messy and unhealthy coop environment, so it is worth fixing right away.
Freezing
In winter, water can freeze when the system is not insulated or heated. Heated bases or built-in heaters are great solutions for cold climates. Insulation also helps when temperatures drop suddenly.
Algae
If you see algae, it usually means the waterer is getting too much sunlight. Algae grow fast in warm, bright spots. Using an opaque reservoir or placing the waterer in the shade helps a lot. More frequent cleaning during the summer is also important.
Preventative Maintenance
The best way to avoid problems is to check your system regularly. Quality parts last longer and reduce the chances of leaks or cracks. If you store your waterer during the off-season, clean it well, drain it completely, and keep it in a sheltered place so it stays in good condition.
Water filters can also help if your tap water has minerals or impurities. Clean water improves the life of your system and keeps your flock healthier.


